PowerPoint’s default placeholders allow you to insert images and animations into your slides, but what if you need to customize slide layouts with text? That’s where text boxes come in handy, letting you insert, adjust, and organize text boxes to create clean and structured presentations.
Once you know how to add a text box in PowerPoint, you can quickly create captions, highlight important points, organize information into sections, and build professional layouts.
In this guide, we cover everything from inserting your first text box to formatting, aligning, and grouping multiple text boxes, step by step.
⭐ Key Takeaways
- Add a text box in PowerPoint from the Insert tab.
- Copy, move, and delete text boxes without affecting other slide elements.
- Use the Align tool to align text boxes in PPT for a consistent layout.
- Group text boxes to move or resize them as a single object.
1. How to Add a Text Box in PowerPoint
The first step to customizing any slide layout is adding a text box. This step allows you to easily place text where you need it, without depending on default placeholders. It is ideal for captions, labels, side notes, and custom slide designs.
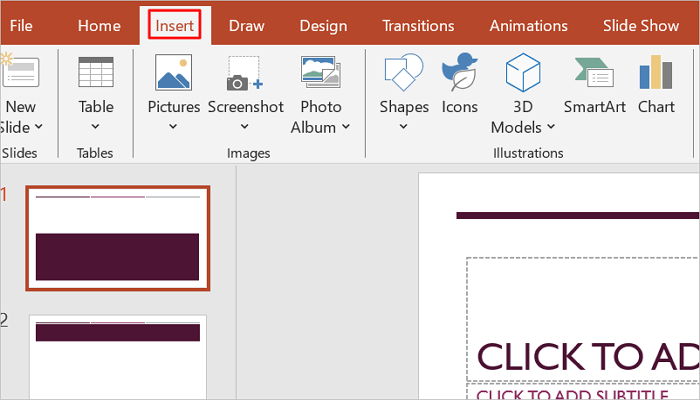
Step 1: Open the Insert Tab
Open your PowerPoint presentation and proceed to the Insert tab in the ribbon menu. The Insert tab contains tools for adding text boxes, pictures, shapes, charts, and other objects.
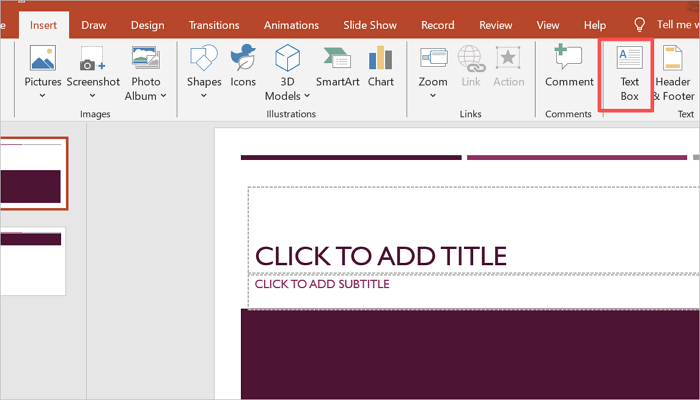
Step 2: Select the Text Box Tool
While in the Insert tab, find and select the Text Box tool. Your mouse cursor will change into a crosshair if you have selected the option properly.
Step 3: Click and Drag on the Slide to Create a Box
Position your cursor on the slide and click once if you want a flexible text box that expands as you type. Alternatively, click and drag to draw a box with a fixed size.

2. How to Copy, Move, and Delete a Text Box
After you insert text box in PPT, you will often need to duplicate, reposition, or remove unnecessary ones. These are important skills when editing slides in PowerPoint.
1️⃣ How to Copy a Text Box
To copy a text box in PowerPoint:
- Click the text box border (not the text inside).
- Press Ctrl + C (Windows) or Cmd + C (Mac) to copy.
- Then, press Ctrl + V or Cmd + V to paste a duplicate.
2️⃣ How to Move a Text Box
To move a text box in PowerPoint:
- Select the text box.
- Click and drag it to the new position.
- Alternatively, use the keyboard arrows for more precise positioning.
3️⃣ How to Delete a Text Box Safely
To delete a text box:
- Select the text box.
- Press Delete or Backspace on your keyboard.
3. How to Format a Text Box in PowerPoint
Want to improve clarity and make important information stand out in your slides? This is where formatting becomes useful. Let’s see how to use the formatting options in PowerPoint.
1️⃣ Change Font Style and Size
To modify the font style or size in PowerPoint:
- Click inside the text box.
- Select the text you want to format.
- Go to the Home > Font to customize the typeface and text size.
2️⃣ Adjust Color, Fill, and Outline
To change color, fill, or outline:
- Right-click the text box.
- Select Format Shape.
- Use Fill to add a background color or gradient.
- Then, use Shape Outline to change outline color and adjust transparency.
3️⃣ Apply Alignment and Spacing Settings
To apply alignment and spacing settings in PPT:
- Select your text and go to Home > Paragraph.
- Align text left, center, or right.
- Also, increase line spacing and add spacing between paragraphs.
4. How to Align Text Boxes in PPT
Alignment in PowerPoint ensures a clean and professional slide layout. Without proper alignment, your slides will look messy and difficult to follow.
Step 1: Select Multiple Text Boxes
Hold the Ctrl key and click each text box you want to align. Alternatively, drag your cursor across multiple objects to select them together.
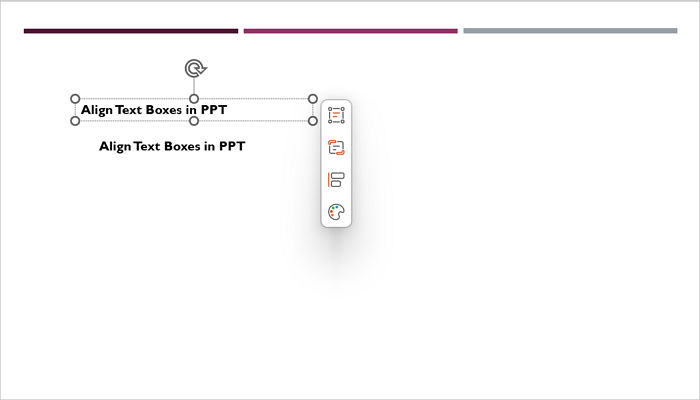
Step 2: Use Align Options in the Arrange Menu
Open the Shape Format tab and go to Arrange > Align. All selected objects will display selection handles.
Step 3: Choose Alignment Type (Left, Center, Right, Distribute)
PowerPoint offers several alignment options, including:
- Align left
- Align center
- Align right
- Align top
- Distribute horizontally
- Distribute vertically
The Align Center option, for example, is ideal when you need to center text boxes in PowerPoint.

5. How to Group Text Boxes in PowerPoint
Grouping in PowerPoint helps you manage multiple text boxes as a single object. It is particularly useful when moving or resizing related elements together.
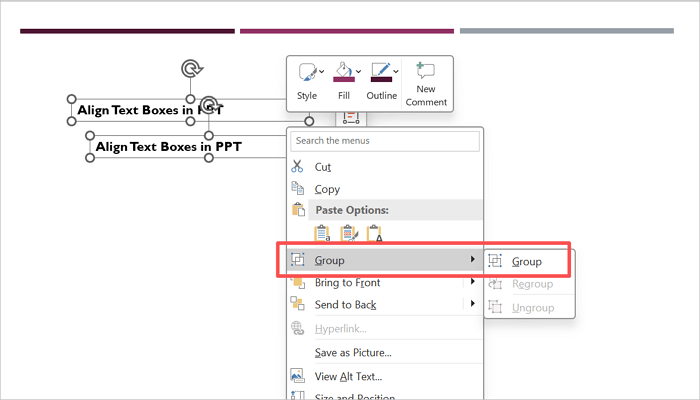
Step 1: Select Multiple Text Boxes
Hold the Ctrl key and click each text box you want to group. You can group text boxes with shapes, images, and icons.

Step 2: Use Group Option from Right-Click Menu
Right-click any of the objects you selected and click Group > Group. The grouped objects should now move together.
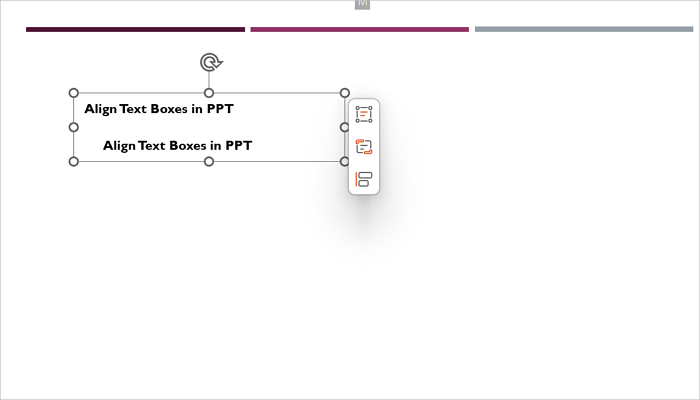
Step 3: Move or Resize as One Unit
Once grouped, select anywhere on the group and move it freely across the slide. You can also resize all boxes by dragging a corner handle.
6. How to Wrap and Organize Text Inside Text Boxes
Another way to improve readability and balance in your slides is through proper spacing and organization. Large blocks of text are harder for audiences to follow during presentations.
Step 1: Adjust Box Size for Automatic Wrapping
- Click the text box border.
- Drag the side handles inward.
- As the box becomes narrower, PowerPoint automatically wraps the text into multiple lines.
Step 2: Use Line Spacing and Paragraph Settings
- Select the text.
- Go to Home > Paragraph.
- Open Paragraph settings to adjust line and paragraph spacing or create bullet lists.
Step 3: Break Content into Multiple Text Boxes if Needed
- Instead of placing everything in one large text box, separate the content into smaller sections. You can:
- Use one text box for titles.
- Another for descriptions.
- Another for captions.
7. Advanced Tip: Using Text Boxes in Slide Layouts
You can also use text boxes in the Slide Master, which controls the design of every slide in your presentation. This comes in handy when you need to create consistent layouts such as footers, watermarks, or recurring labels.
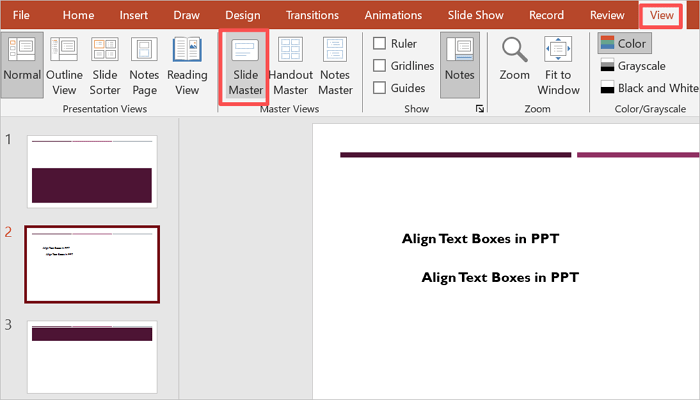
Step 1: Open Slide Master View
Open the View tab and select Slide Master. The top thumbnail represents the master slide, while the smaller thumbnails below show individual layout variants.
Step 2: Add Text Boxes to Layouts
In the Slide Master view, click the layout you want to modify and insert text box in PPT via the Insert tab.

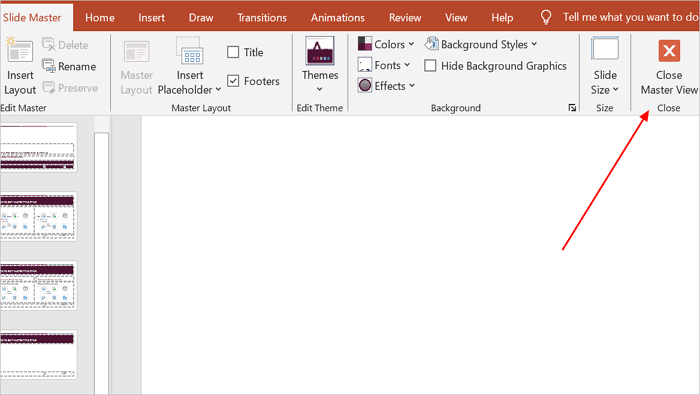
Step 3: Apply Changes across Multiple Slides
Close the Master View after editing the Slide Master. The text box layout changes will automatically apply across all related slides.
Conclusion
Knowing how to add a text box in PowerPoint is only the beginning. Mastering other actions, such as formatting, aligning, grouping, and organizing, helps you build more flexible and visually structured presentations.
To improve your skills, practice these techniques on a blank slide and experiment with different layouts, spacing, and alignment tools. The more you practice, the better you understand how each tool works together.
Learn More About Text Box PPT
The questions below cover the most common concerns PowerPoint users have with inserting, grouping, and formatting text boxes.
1. How to insert a text box in PowerPoint on your phone?
To insert a text box in PPT using the PowerPoint mobile app:
- Open your presentation.
- Select the desired slide.
- Tap the + (Insert) button.
- Choose Text Box.
- Tap and drag on the slide to create the box.
- Enter your text.
- Resize the text box using the handles if necessary.
2. How to move a text box in PowerPoint on iPad?
To move a text box in PowerPoint on an iPad:
- Open your presentation in the PowerPoint iPad app.
- Tap the border of the text box.
- Wait for selection handles to appear.
- Press and hold the selected text box.
- Drag the text box to the desired location.
- Release your finger to place it.
3. Can you wrap text in a PowerPoint text box?
Yes, you can wrap text in PowerPoint text box. Here’s how to go about it:
- Select the text box.
- Drag the side handles inward.
- The text automatically wraps onto additional lines.
- Adjust line spacing if needed.
- Resize the box until the content looks balanced.