One of the easiest ways to make a presentation easier for an audience to follow is by adding visuals to it. This comes in handy when you’re explaining a process, showcasing a product, or simply telling a visual story.
But if you’re here, you’re probably wondering how to put pictures on PowerPoint. You can insert a single image, paste one you have copied, use a photo as your slide background, or turn a collection of photos into a slideshow.
In this guide, we’ll show you how to choose the best approach based on what you want to do with the pictures.
Key Takeaways
- Insert > Pictures is the easiest option for adding individual image files.
- Paste is faster when you already have a picture copied to your clipboard.
- Photo Album is useful for creating a presentation from a large collection of images on Windows.
- You can also use an image as a slide background when you want it to cover the entire slide.
How to Add Pictures to PowerPoint in Different Ways
PowerPoint gives you several options for adding images to your presentation, but the best method really depends on where the picture is coming from and how you want it to appear on the slide.
1. Insert a Picture into PowerPoint
You can quickly insert an image into PowerPoint through the Insert tab. This method works well when the picture is saved on your computer, and you want control over where it appears on the slide.
Follow these steps to insert a picture directly into PowerPoint:
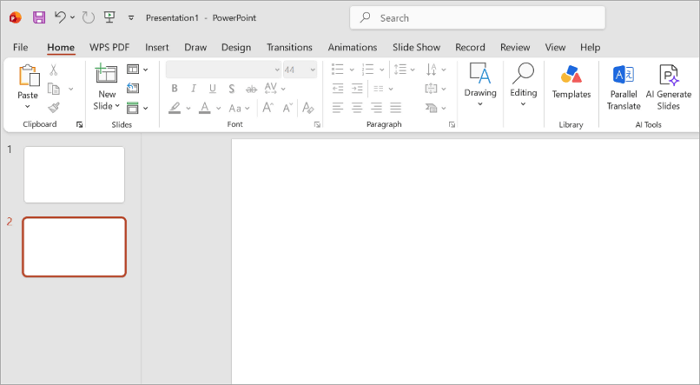
Step 1: Go to the PowerPoint slide where you want to add the image.
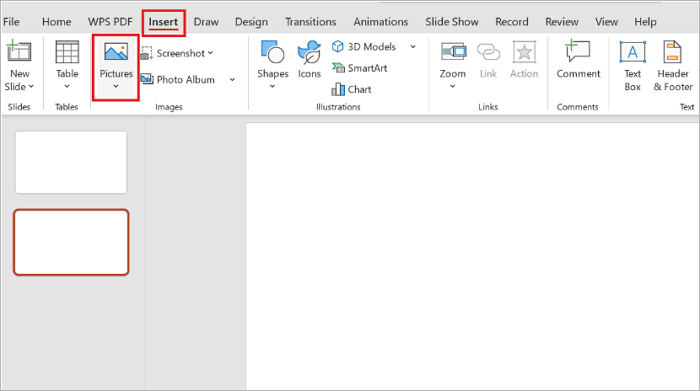
Step 2: Open the Insert tab and select Pictures.
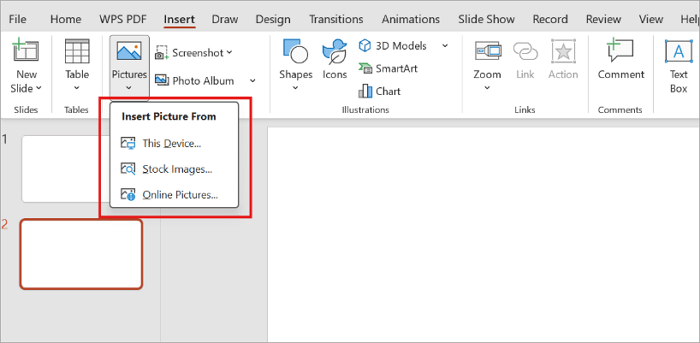
Step 3: Choose the location of your image, such as This Device.
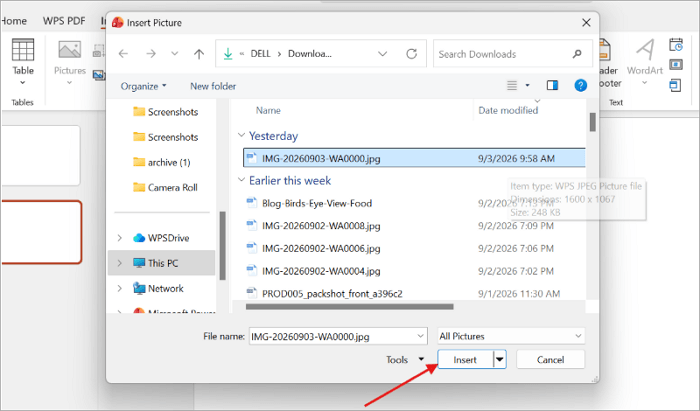
Step 4: Browse to your image file and select Insert.
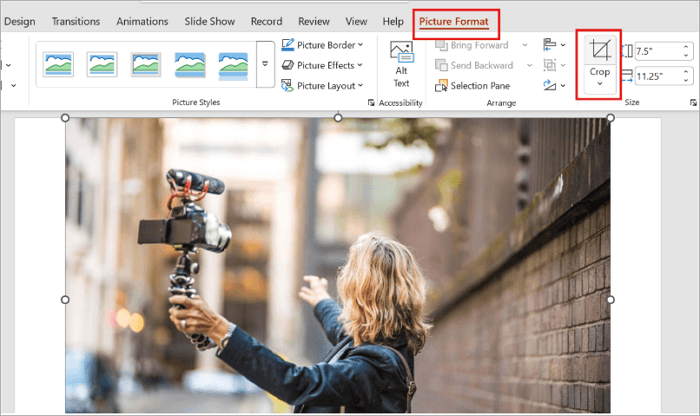
Step 5: Drag the corner handles to resize the picture, and use the Crop tool under Picture Format to trim it to size.
2. Paste a Picture in PowerPoint
Alternatively, you can add a picture to your presentation by simply pasting it onto the slide where you want it. This method works if you’ve already copied an image from a browser, a document, or another slide.
Here’s how to quickly paste a picture in PowerPoint:
Step 1: Find the picture you want to use and copy it using Ctrl + C (Windows) or Command + C (Mac).
Step 2: Go to the target slide in your PowerPoint presentation.

Step 3: Press Ctrl + V (Windows) or Command + V (Mac) to paste it directly onto the slide.
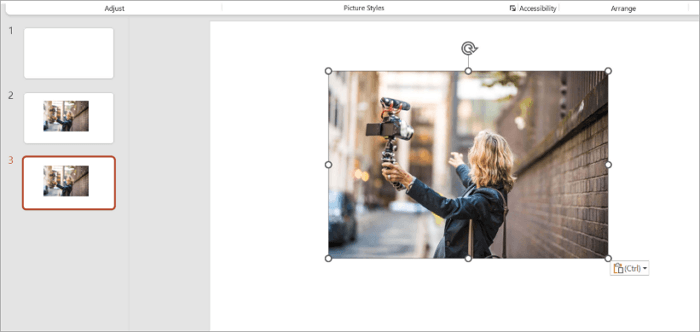
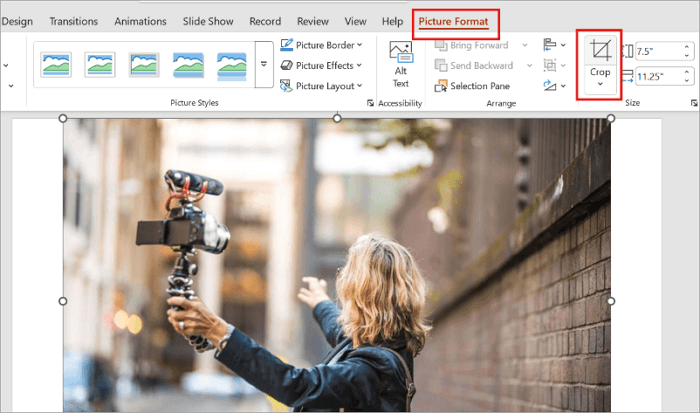
Step 4: After pasting, move, resize, crop, or format the image from the Picture Format menu.
3. Add a Picture as the Slide Background
What about situations where a picture doesn’t work as a regular object? You may want to insert it as a slide background instead.
Here’s how to add pictures to PowerPoint as a background:
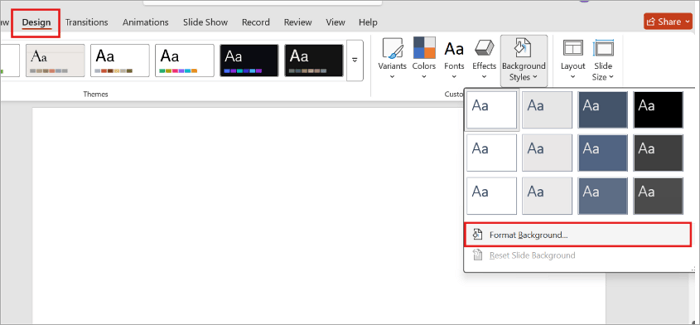
Step 1: Open your PowerPoint slide and go to Design > Background Style > Format Background. Alternatively, right-click anywhere on the slide and select Format Background.
Step 2: Select Picture or texture fill in the Format Background panel.

Step 3: Under Picture source, click Insert and select the location of your image.
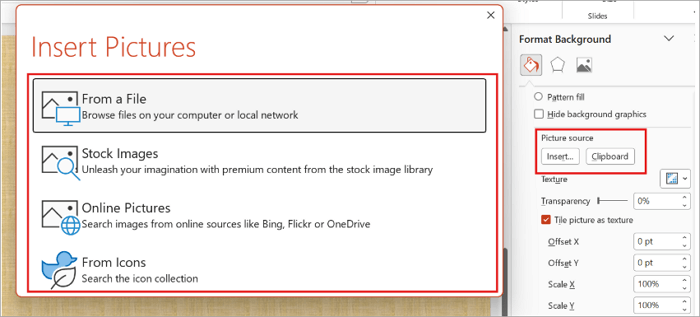
Step 4: Adjust the Transparency setting from the Format Background panel to keep text readable.

How to Make a PowerPoint Photo Slideshow
If you have dozens of pictures, adding them individually can take a lot of time. PowerPoint’s Photo Album feature can automatically turn a collection of images into a presentation on supported desktop versions of PowerPoint for Windows.
Here’s how to make a PowerPoint photo slideshow using this feature:
Step 1: Open Photo Album
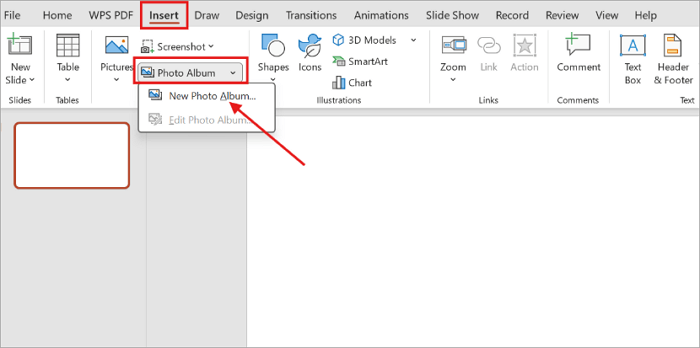
Create or open a presentation in PowerPoint and go to Insert > Photo Album > New Photo Album.
Step 2: Add Your Pictures
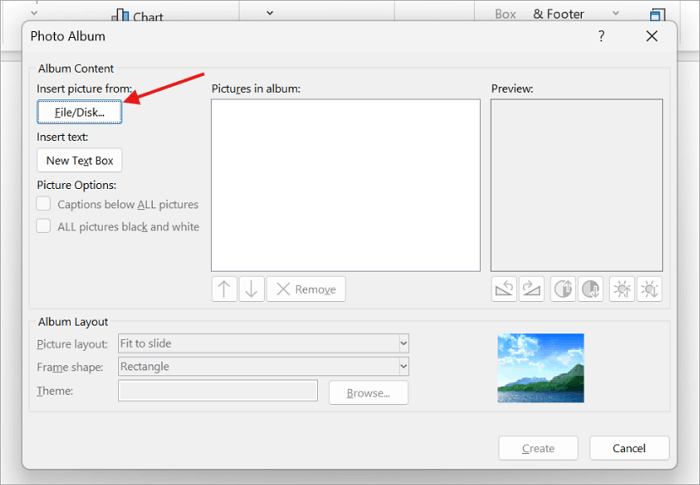
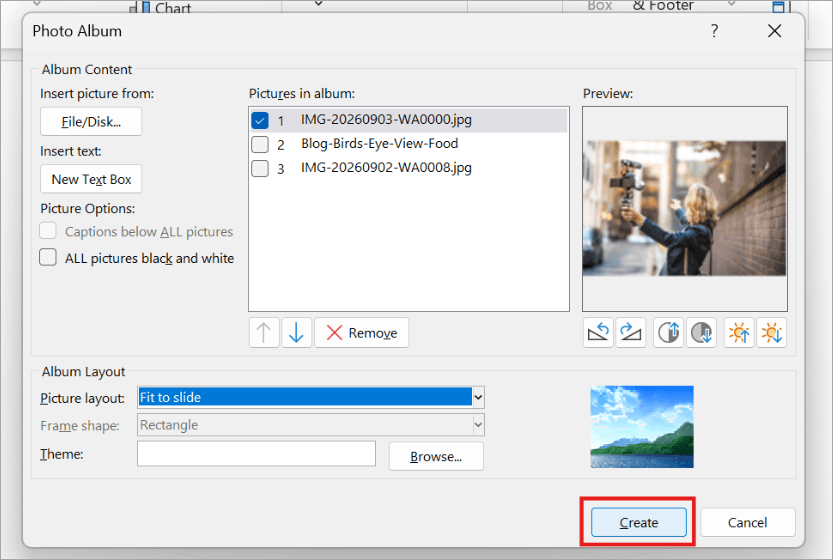
In the Photo Album window, click File/Disk under Insert picture from and select as many photos as you want to add. Then click Create.
Step 3: Arrange the Photo Order
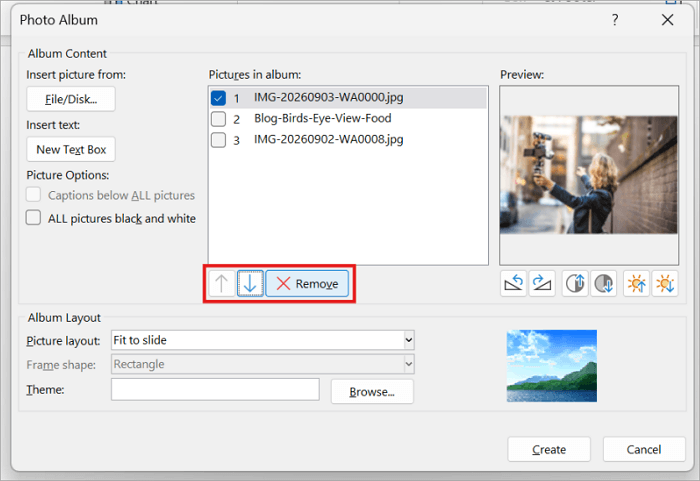
Select an image and use the up or down arrows to change its position and arrange the images in the sequence you want your audience to see.
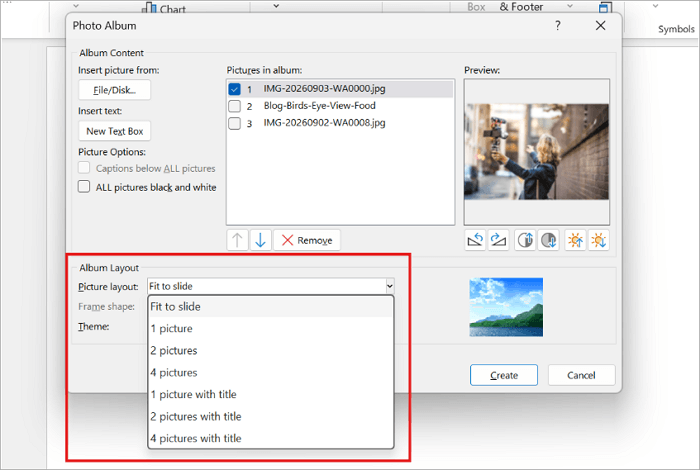
Step 4: Choose the Picture Layout
Under Album Layout, choose how the pictures should appear. For example, Fit to slide is a good choice for a simple slideshow with one large image on each slide.
Step 5: Create the Slideshow
When you’re happy with the settings, click Create, and PowerPoint will generate the photo album as a presentation.
How to Insert Many Pictures as Individual Slides
If you don’t have access to Photo Album, you can also create a photo slideshow manually. This method gives you more control over each slide because you insert and format one picture at a time.
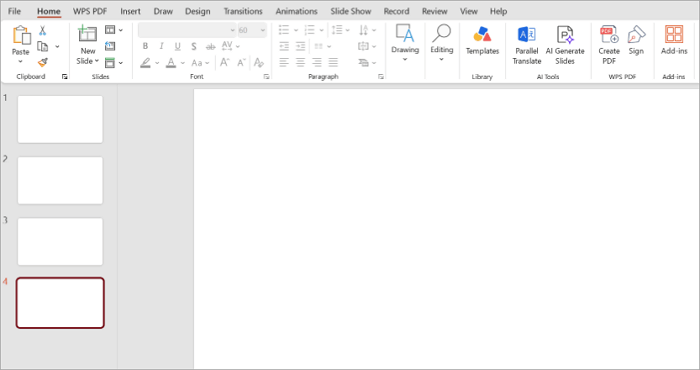
Step 1: Create Blank Slides
Open your PowerPoint presentation and create the number of blank slides you need for your pictures.
Step 2: Insert One Picture on Each Slide
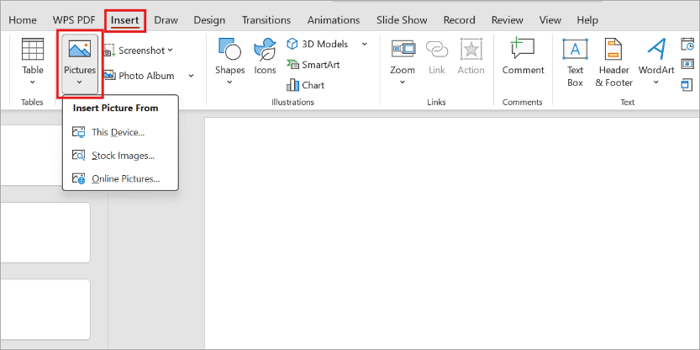
Select the first blank slide and go to Insert > Pictures. Find the picture you want to use and click Insert.
Step 3: Resize or Crop the Pictures
After inserting a picture, drag its corner handles to resize it while keeping its proportions. If the image doesn’t fit the slide properly, select it and use Picture Format > Crop to adjust the framing. Continue adding and formatting the remaining pictures until each slide contains the image you want.

There’s an important difference between adding pictures to PowerPoint using this manual method and selecting several files at once through Insert > Pictures. With the latter, PowerPoint normally places the pictures on the same slide rather than automatically creating one slide for each image.
That’s why Photo Album is the more convenient option when you’re working with a large collection.
Common Problems When Adding Pictures to PowerPoint
Even after knowing how to put pictures in a PowerPoint presentation, there are still a few issues that can affect the final result. Let’s see how you can quickly fix them.
- The picture looks blurry: Enlarging a small picture too much can make it look blurry. Instead, use a higher-resolution image.
- The picture looks stretched: Resize the image from its corners rather than dragging only one side.
- Multiple pictures appear on one slide: If you selected several files using the standard Insert option, PowerPoint may place them together. To put them on separate slides, use the Photo Album feature.
- The photo does not fit the slide: Crop the image or choose a picture with an aspect ratio closer to your slide dimensions.
- The file is too large: Large, high-resolution images can increase your presentation’s file size, making your presentation difficult to share or load. You may compress the picture to reduce its size.
Conclusion
Knowing how to put pictures on PowerPoint gives you more flexibility when building visual presentations. For a few images, the Insert or Paste options are quick and simple.
However, when you’re working with a large collection, Photo Album can help you save time by creating separate slides automatically.
Before you start, organize your image files and put them in the order you want. This small step can make adding pictures and creating your slideshow much easier.
FAQs on Adding Pictures to PowerPoint
Still need help with adding pictures to your PowerPoint presentation? Here are answers to some common questions about the topic.
1. How do I add pictures to PowerPoint online?
You can insert pictures in PowerPoint online directly from your browser. To do this:
- Open your presentation and select a slide.
- Click Insert > Pictures.
- Choose This Device, Stock Images, Search the Web, Mobile Device, or OneDrive, depending on where the picture is stored.
- Select your image and click Insert.
2. How do I make a PowerPoint photo slideshow on Mac?
Unlike PowerPoint for Windows, PowerPoint for Mac does not offer the Photo Album feature in the same way. Instead, you need to create the slides and use Insert > Picture > Picture From File to add your photos individually.
You can also select multiple pictures at once when inserting them. Arrange the slides afterward to create your desired sequence.
3. Can I make a picture the background of a PowerPoint slide?
Yes. PowerPoint allows you to use a picture as a slide background. Here’s how to set a picture as a slide background in PowerPoint:
- Go to the slide where you want the new background.
- Right-click anywhere on the slide and go to Format Background.
- Click Picture or texture fill.
- Insert your image.
- You can also adjust its transparency and apply the background to all slides.