That awkward moment when you are ready to send the PowerPoint presentation, and the email says the file is too large? Yep- we have all been there.
Slides packed with high-resolution photos look great, but they also make presentations heavy and frustrating to share. For students, this can mean last-minute stress before a deadline or resorting to awkward compression tools that ruin image quality.
The good news? Shrinking your PowerPoint doesn’t have to mean blurry images anymore. In the next few minutes, you will find out how to get there.
Related Post: >> How to Reduce PowerPoint File Size Without Losing Quality
Why PowerPoint Files Get Too Large
PowerPoint files often increase in size for a few practical reasons that many users overlook.
1️⃣ High-Resolution Images
Images taken with modern phones or cameras are built for print and large displays. Because of that, a single background image in PPT can easily take up several megabytes inside a PPT file.
2️⃣ The Same Image Used Multiple Times
Reusing an image across different slides may seem harmless. However, when images are copied and pasted instead of reused properly, each version can be saved separately, gradually increasing the file size.
3️⃣ Embedded Videos and Audio
Media files add noticeable weight to a presentation. Even short video or audio clips can cause the PPT file size to grow much faster than expected.
With these causes in mind, the next step is to learn how to make a PowerPoint presentation file lighter and easier to share.
How to Compress Photos in PowerPoint Using a Built-In Tool
PowerPoint includes a built-in image compression tool that’s ideal for quickly reducing file size.
Step 1: Select the image
Click any image on the slide to activate the picture format tab.
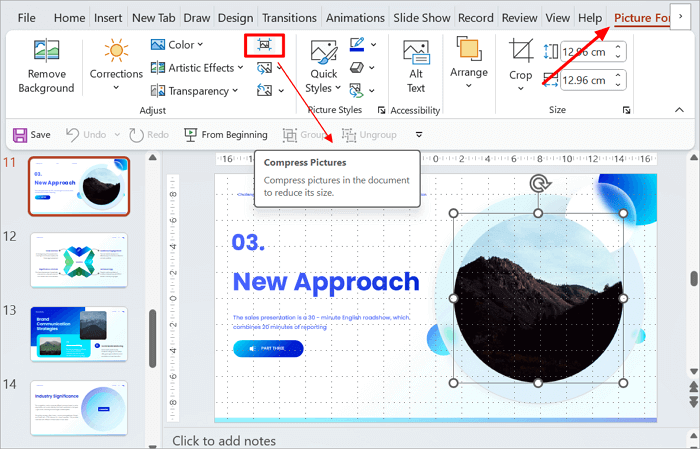
Step 2: Click “Compress Pictures“
In the Picture Format tab, look for the Compress Pictures button, usually on the right side of the toolbar. Click it to open the compression settings.
Step 3: Select compression
A dialog box will appear with compression options. Uncheck “Apply only to this picture” to compress all images in the presentation at once.
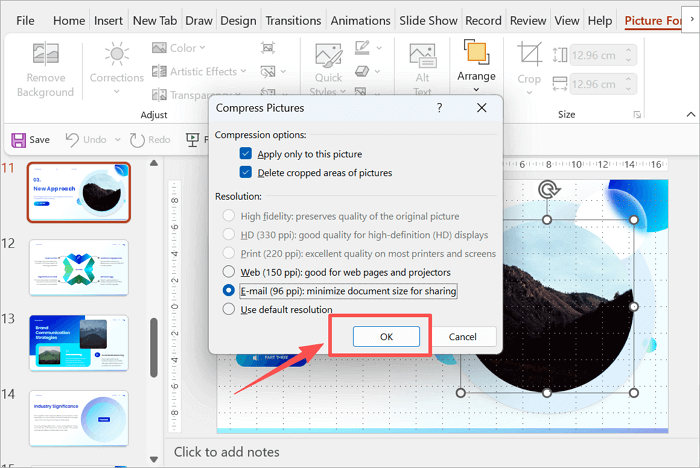
Choose a compression ratio based on your requirement.
- HD (330 ppi) is suitable for high-definition displays, but the file size will be larger.
- Print (220 ppi) slightly larger file, but excellent quality on most printers, and screens
- Screen/Web (150 ppi) is the best balance for on-screen presentation.
- Email (96ppi), smallest size, still readable for slides.
Step 4: Start the compression
Click the “OK” button to compress the file.
Tip: For most presentations, a Screen/Web (150 ppi) resolution keeps images sharp while reducing file size.
How to Compress Images in PowerPoint Using an Online Tool
Sometimes PowerPoint’s built-in compression is insufficient, especially when working with very large photos. An online tool like TinyPNG is useful in such situations. It reduces image file size while keeping the visuals clean.
To reduce the file size using TinyPNG, follow the steps below.
Step 1: Upload your images
Go to tinypng.com and upload your images. You can upload multiple images at once.
Step 2: Compress the image
Let the tool automatically compress them. No need to add/ change settings.

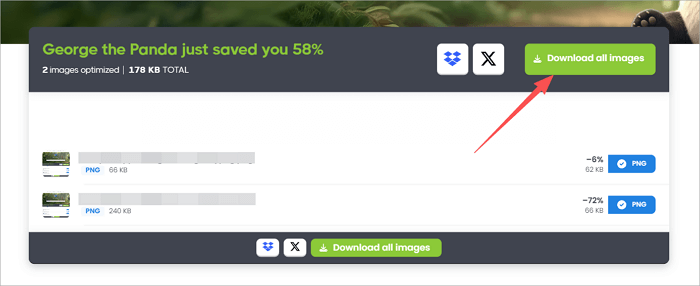
Step 3: Download the image
Click the Download all images button to download the compressed file to your computer.
Step 4: Replace the images in your PPT
Use the compressed images to replace larger images in your PowerPoint presentation.
How to Compress Pictures in PowerPoint by Cropping
Cropping images is a simple but powerful way to compress ppt images. For best results, crop images before inserting them into PowerPoint using a photo editor or an online tool. When you crop inside PowerPoint, the hidden parts of the images are still saved unless you delete the cropped data.
External cropping permanently removes these pixels, making the file smaller from the start.
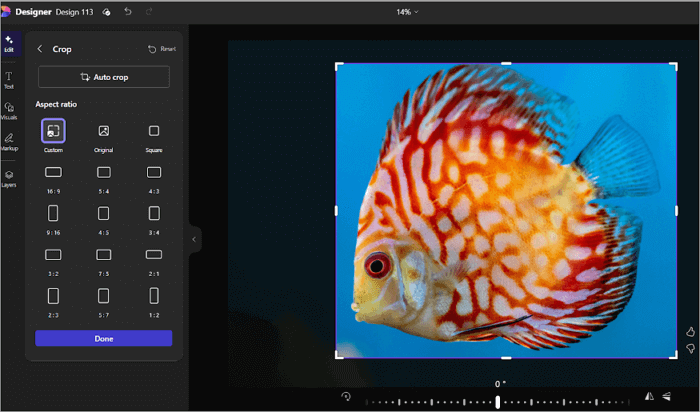
Step 1: Open the image in an external editing tool
Use a built-in app like Photos, Microsoft Designer, or Preview on Mac, or choose any reliable online image editor.
Step 2: Crop out unwanted areas.
Remove background space, edges, or details that are not needed for the slide. Focus on the main subject so the image stays clear and relevant.
Step 3: Save changes.
Save the edited image as a new file to ensure only the cropped version is kept. This prevents PowerPoint from storing the original image data.
Step 4: Add to Presentation
Insert the cropped file into your PowerPoint slide. This approach helps keep your presentation lightweight without reducing visual quality.
Create Lightweight PowerPoint Slides Using AiPPT.com
AiPPT.com offers a smarter solution to our problem. While it does not compress photos in ppt directly, the slides it generates are lightweight by design! This way, a user can avoid oversized PowerPoint files from the start.
A presentation generated by AiPPT offers faster downloads and easier sharing without worrying about file size. You can share a slide link, rather than the full file, which is easier for your classmates and professors to access.
Here is how to create size-optimized slides with AiPPT.
Step 1: Go to AiPPT.com and sign in. If you don’t have an account, create one.

Step 2: Enter a description of the presentation you want to create in the box provided. AiPPT can generate images using Google’s new Nano Banana tool for your slide.

Step 3: AiPPT will generate the outline. You can edit the outline to finetune. Then click Generate to create the presentation.

Step 4: Your optimized, lightweight PPT is ready. You can either download the presentation to your computer or share a link with your team.

AiPPT offers additional perks, including batch slide creation, AI-powered design suggestions, and seamless cross-device compatibility.
Conclusion
Compressing images in PowerPoint is not just about saving space on your laptop. It makes real-life work much easier. Smaller files open faster and run more smoothly during presentations. And you already know what sort of hassle it is to share a large file with your team.
The smartest approach, however, is to use a mix of techniques to compress photos in PowerPoint. Crop images before inserting them into the slides with a third-party tool, or create optimized slides with AiPPT from the start. This way, you will avoid the stress of oversized slides altogether.
If you want to know more about how to compress photos in PowerPoint, we have included an FAQ section below.
FAQs on How to Compress PPT Images
Before we wrap up, here are answers to some of the most common questions students ask when trying to shrink PowerPoint slides on different devices.
1. How to compress pictures in PPT on Mac?
Compressing images on a Mac is quick once you know where to look.
- Open your presentation and click any image.
- Go to the Picture format tab in the top menu.
- Select Compress pictures. Uncheck Apply only to this picture if you want to compress all images.
- Select a resolution, such as Screen (150 ppi), and click OK.
This will compress pictures in PPT while keeping the file size down.
2. How to compress photos in PPT to Email 96 PPI?
Email (96ppi) is ideal when the file matters more than the ultra-high quality.
- Select the image you want to compress in the PowerPoint presentation.
- Open the Picture format tab and click Compress Picture.
- Under Resolution Options, select Email (96ppi).
- Click OK and save the file.
3. How to compress images in PowerPoint on iPad?
PowerPoint on iPad has limited compression controls, but there is a workaround.
- Before inserting the image, resize or compress it using the Photos app or an online tool.
- Open PowerPoint and insert the images.
- Avoid adding original high-resolution photos directly from the camera roll.