Have you ever tried sending a PowerPoint file only to realize it’s too large for email? Or noticed your presentation running slowly during an important meeting? These are common frustrations that many people face when dealing with bulky slide decks. That’s why knowing how to compress a PowerPoint without losing quality is so important.
You may often worry that reducing file size will damage images, videos, or designs. In this guide, we’ll address those concerns and provide practical ways to keep your presentations both light and professional.
Common Causes of Large PPT Files
Before learning how to reduce file size, it helps to understand why presentations often become too large. Here are the most common culprits:
🖼️ High-Resolution Images: Uncompressed or oversized images, especially at print-quality resolution (300 DPI), add significant weight to your slides.
🎞️ Embedded Videos and Audio: Full-length media files stored directly in the presentation can take up hundreds of megabytes.
🎨 Too Many Fonts and Styles: Multiple fonts, themes, or custom styles increase the file size by embedding extra data.
📁 Inefficient File Formats: Older “.PPT” files are larger and less efficient than “.PPTX”. Saving in “.PPTX” is usually best, but in some cases, users can choose other formats (like PDF) to meet specific sharing or storage needs.
🗃️ Hidden Data and Unused Elements: Old revisions, slide notes, or unused objects remain in the background and inflate file size unnecessarily.
When is Reducing PowerPoint Size Beneficial?
PowerPoint files don’t need optimization all the time, but there are many situations where making a presentation smaller really pays off. For example:
- When you want to send slides by email, but the file size exceeds attachment limits or causes long upload times.
- When working with people in locations with slow or unstable internet connections, heavy presentations can be slow or fail to sync.
- When archiving many presentations, smaller files save disk space and make backups faster and cheaper.
- When loading and navigating a slide, it becomes sluggish because of embedded content like high-res images or multiple masters/layouts.
Below is a table showing some common size-reducing methods and when each is most useful:
| Method | Best Use Case |
|---|---|
| 1. Compress Pictures in PowerPoint | Slides with many high-resolution images that aren’t seen clearly in full size. |
| 2. Optimize Media Files in PPT | Presentations with embedded video or audio. |
| 3. Remove Unused Slide Masters and Layouts | PPT templates copied/pasted or designs cluttered by unused layouts. |
| 4. Embed Fonts Wisely | When using custom fonts for sharing, but want to avoid embedding entire font sets. |
| 5. Save in Efficient File Formats | Older PPT that inflates the size. |
| 6. Use Linked Content Instead of Embedding | Large external files (media, documents) not required to be inside the presentation. |
| 7. Remove Hidden Data in PowerPoint Slides | Large external files (media, documents) are not required to be inside the presentation. |
How to Reduce PPT Size in 7 Ways
In this section, we’ll cover seven proven methods for how to compress PPT file sizes without losing quality. Whether your slides are overloaded with high-resolution images, embedded videos, or hidden data, these techniques will help you create presentations that are lighter, faster, and easier to share.
Method 1. Compress Pictures in PowerPoint
Images are often the largest contributors to bulky PowerPoint files, and there are several ways to reduce their impact. You can use PowerPoint’s built-in compression, resize images before inserting them, convert heavy formats like BMP or TIFF to lighter ones such as JPEG or PNG, remove cropped areas, or optimize them using external tools.
Among these, using PowerPoint’s built-in compression is usually the best option, as it balances quality and file size automatically, works for all images in the presentation, and doesn’t require extra software.
🔍 Here is how to reduce PowerPoint file size with the built-in PPT size reducer:
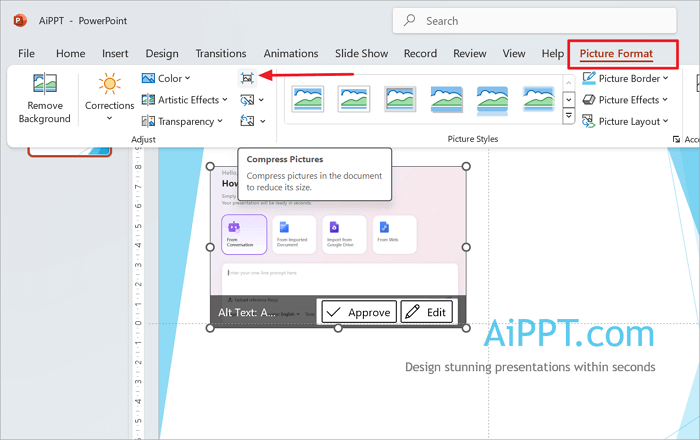
Step 1. Click on any picture in your slide to select it.
Step 2. Then, you can find the Picture Format option on the ribbon. In the toolbar, click the Compress Pictures button.
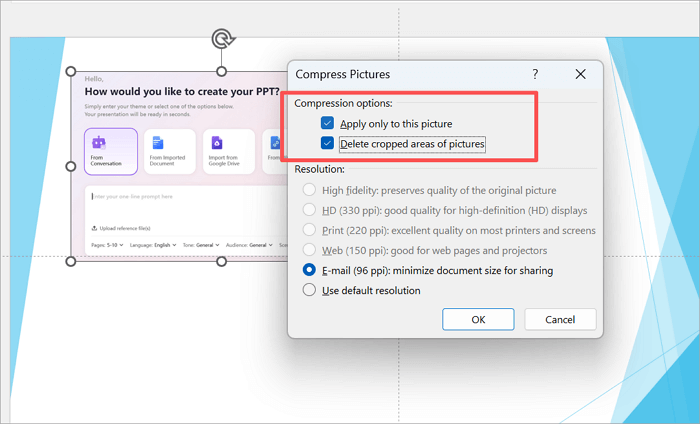
Step 3. Choose from these options:
- Check Apply to all pictures in this file to compress all images at once.
- Optionally, check Delete cropped areas of pictures to remove hidden data.
Step 4. Choose the image resolution based on your needs:
- Email (96 ppi) – smallest size for sharing.
- Web (150 ppi) – good balance between quality and size.
- Print (220 ppi) – highest quality for printing.
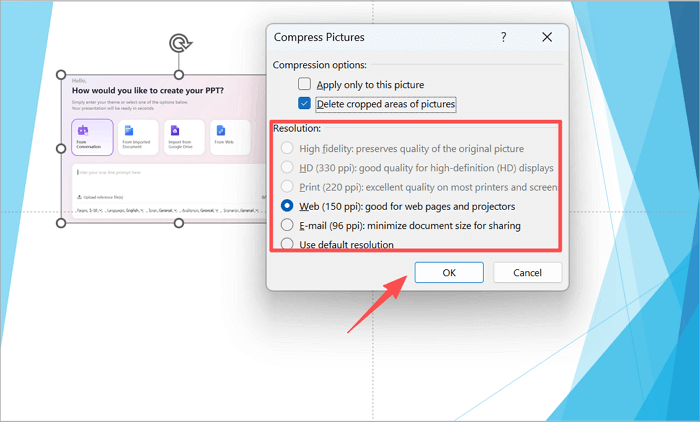
Step 5. Click OK to compress the images.
Method 2. Optimize Media Files in PPT
Presentations with rich multimedia can feel impressive, but they often struggle with performance and sharing. There are several ways to reduce the size of videos and audio: compress them directly in PowerPoint or convert them to lighter formats before inserting.
Among these, using PowerPoint’s built-in compression is usually the best option, as it effectively helps compress PowerPoint files while maintaining playback quality for all media in the presentation.
🔍 The following tutorial will teach you how to compress a PowerPoint presentation with the built-in tool:
Step 1. Select any video or audio clip in your presentation.
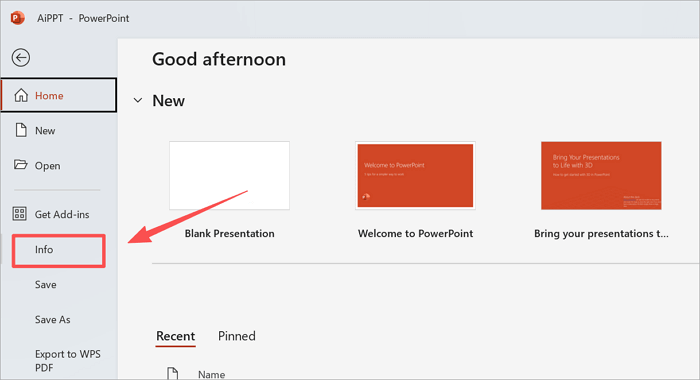
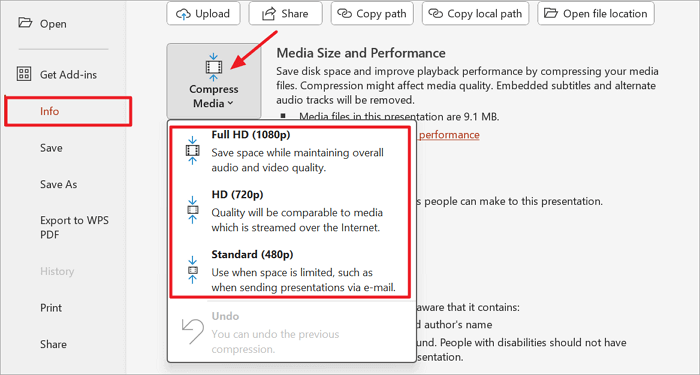
Step 2. Click the File tab on the ribbon and choose Info.
Step 3. Click the Compress Media button and select a quality option: Full HD (1080p), HD (720p), or Standard (480p).
Step 4. PowerPoint will compress the selected media; wait until the progress bar completes.
Method 3. Remove Unused Slide Masters and Layouts
Some presentations become large because multiple slide masters and layouts accumulate over time. This often happens when users copy slides from different templates or import content from other presentations, leaving behind unused layouts.
You can judge if this is the problem by opening View > Slide Master: if you see several masters or layouts that aren’t applied to any slides, they are taking up unnecessary space. Removing these unused elements can significantly help shrink the PowerPoint file size and make the presentation easier to manage.
🔍 This tutorial will guide you through reducing the size of PowerPoint files step by step:
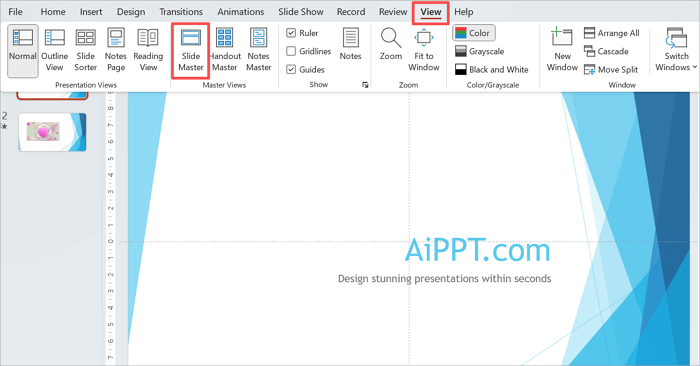
Step 1. Open your presentation and go to the View tab on the ribbon.
Step 2. Click Slide Master in the Master Views group to open the Slide Master view.
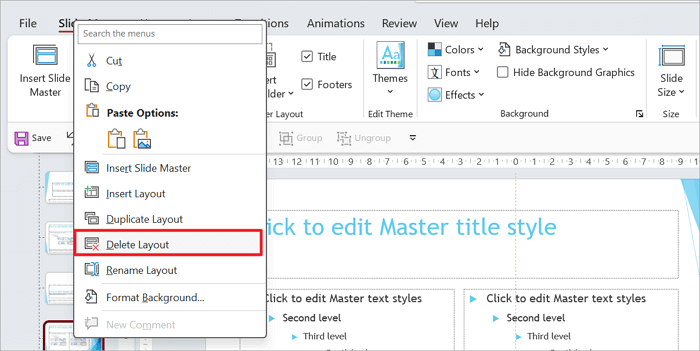
Step 3. In the left-hand panel, scroll through all slide masters and their layouts. Identify any masters or layouts not used by any slides in your presentation.
Step 4. Right-click the unused master or layout and select Delete Master (or Delete Layout).
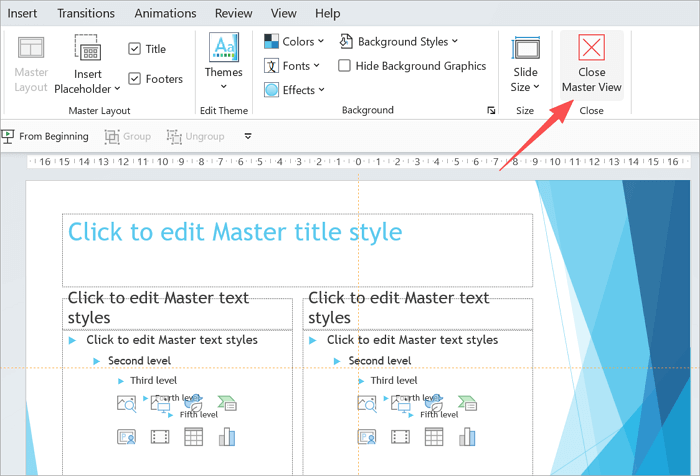
Step 5. After removing unused masters, click Close Master View on the ribbon to return to normal editing.
Method 4. Embed Fonts Wisely
Using custom fonts can enhance a presentation’s design, but embedding every font can significantly increase file size. This often happens when slides include multiple unique fonts or content copied from other presentations with different styles. For example, marketing teams preparing client pitches or educators creating template-based lecture slides may unintentionally embed many fonts.
By embedding only the fonts actually used, or limiting the number of embedded fonts, you can preserve the presentation’s appearance and make a PowerPoint smaller without compromising design quality.
🔍 Follow these steps to reduce the size of PowerPoint easily:
Step 1. Click the File tab in the ribbon.
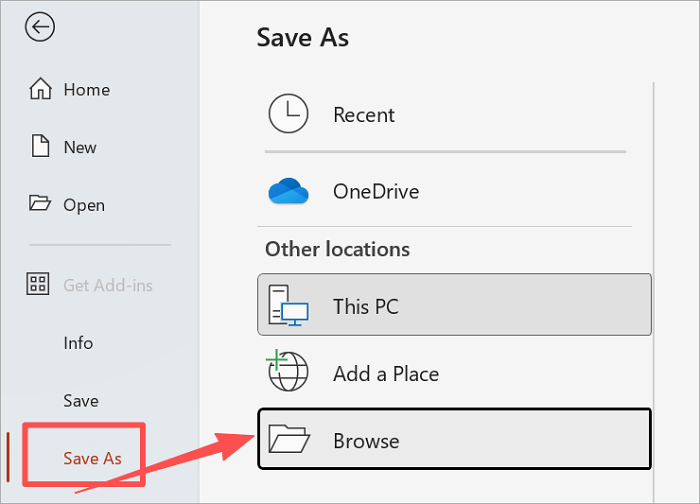
Step 2. Select Save As, then choose a location to save your presentation.
Step 3. In the Save As dialog, click Tools (next to the Save button) and select Save Options.

Step 4. Under the Preserve fidelity when sharing this presentation section, check Embed fonts in the file and select Embed only the characters used in the presentation.

Step 5. Click OK, then save your presentation.
Method 5. Save in Efficient File Formats
PowerPoint presentations can vary greatly in size depending on the file format used. Older formats like .ppt often result in larger files due to less efficient compression methods, while the modern .pptx format uses XML-based compression to reduce file size automatically.
In some situations, users can also save presentations as PDF or image files, or compress the PPT into a ZIP file when sending it via email. Choosing the right format or compressing appropriately is an effective way to shrink a PPT file and improve portability.
🔍 Here is how to condense a PowerPoint file by converting it into PDF/PPTX:
Step 1. Click the File tab in the ribbon and select Save As.
Step 2. Choose the location where you want to save the file.
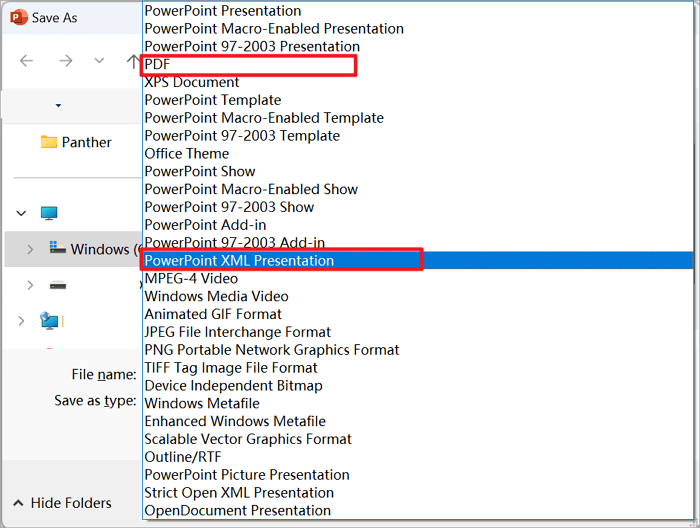
Step 3. In the Save as type dropdown menu, select PowerPoint Presentation (.pptx) or PDF (.pdf).
Step 4. Click Save to store the presentation in the selected format.
Method 6. Use Linked Content Instead of Embedding
Large files such as videos, audio, or charts can quickly inflate a PowerPoint presentation when embedded directly. This often happens when slides include high-resolution media or content copied from other sources.
By linking to external files instead of embedding them, PowerPoint only references the content without storing the full data inside the file. This approach reduces the presentation’s size while keeping the content accessible, making it an effective method for compressing a PPT.
🔍 Follow the steps to decrease the PowerPoint file size by inserting a video link into the slides.
Step 1. For videos, go to the slide and click Insert > Video > Online Video, then paste the video URL to link it.

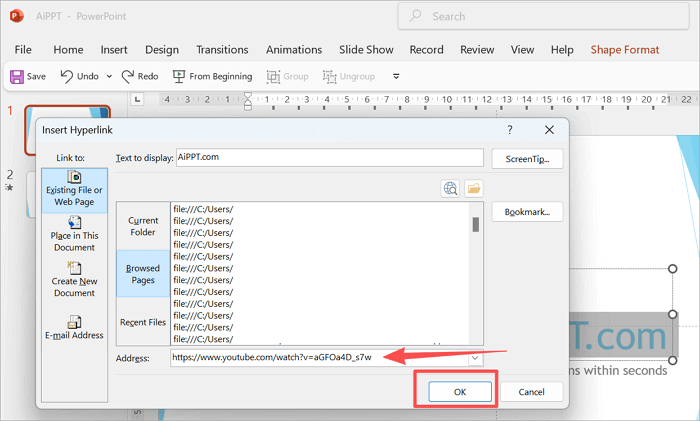
Step 2. For other types of content, you can select text, shapes, or images, then click Insert > Link and paste the URL of the external file.
Step 3. Verify the link works by clicking it in Slide Show mode.
Step 4. Save your presentation.
If you want to know more detailed steps to link to a video in PowerPoint, the operations in this post can help: >> How to Embed a YouTube Video in PowerPoint
Method 7. Remove Hidden Data in PowerPoint Slides
PowerPoint files often contain hidden data such as comments, revision history, invisible objects, or personal information because presentations are frequently edited, reviewed, and shared multiple times. Each edit, comment, or copy-paste action can leave behind metadata or invisible elements that accumulate over time, increasing file size.
Removing these hidden elements helps streamline the presentation and is an effective way to reduce the size of PPT without affecting the visible slides or content.
🔍 Follow this tutorial to learn how to minimize PowerPoint file size step by step:
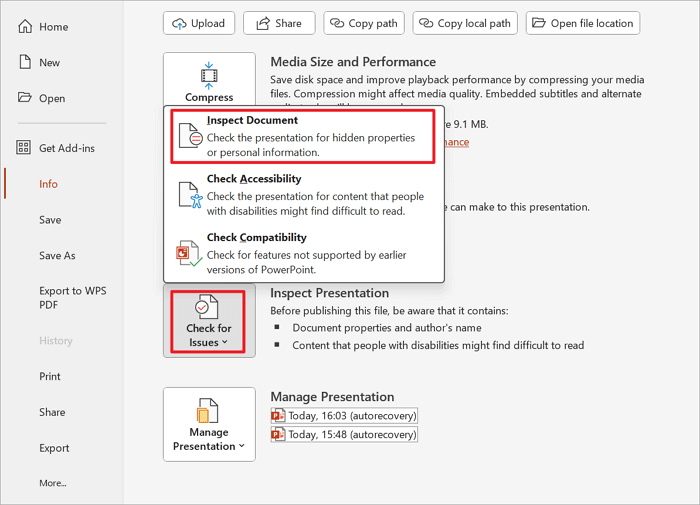
Step 1. Click the File tab and select Info.
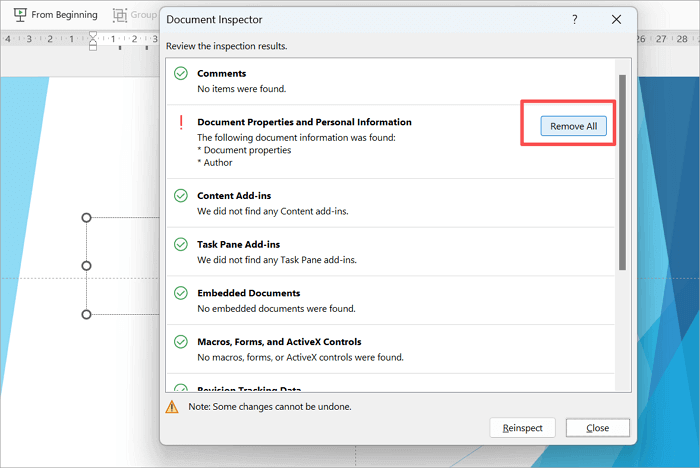
Step 2. Click Check for Issues and choose Inspect Document.
Step 3. In the Document Inspector window, check the boxes for the types of hidden content you want to remove (e.g., comments, document properties, invisible objects).
Step 4. Click Remove All for each type, then click Close.
Step 5. Save your presentation.
Conclusion
Large PowerPoint files can be frustrating to share, store, or present, but there are multiple ways to manage their size effectively. In this guide, we explored seven practical methods for how to reduce PowerPoint file size, including compressing images, optimizing media files, removing unused slide masters, embedding fonts wisely, saving in efficient file formats, using linked content, and clearing hidden data. By applying these techniques thoughtfully, you can maintain presentation quality while making your files more manageable, shareable, and efficient for any situation.
FAQs About Compressing a PPT
The following FAQs address common concerns, practical tips, and clarifications to help you better understand how to reduce PowerPoint file size efficiently.
1. Can I use a PPT compressor to reduce my presentation to under 20 MB?
Yes, you can reduce the size of your PowerPoint presentation to under 20 MB using either built-in tools or external compressors. Large presentations often exceed size limits due to high-resolution images, embedded media, or complex slide designs. By compressing these elements within PowerPoint, you can significantly shrink the file while keeping content intact.
Steps to Compress a PPT Using PowerPoint’s Built-In Tools:
- Step 1. Click any image in your presentation.
- Step 2. Go to Picture Format on the ribbon, then click Compress Pictures.
- Step 3. In the dialog box, choose the resolution (e.g., Email/150 ppi for small files) and uncheck Apply only to this picture if you want to compress all images.
- Step 4. Click OK and save your presentation.
2. Why is my PowerPoint file so large?
PowerPoint files can become large for several reasons. High-resolution images, embedded videos or audio, multiple slide masters, custom fonts, and hidden data like comments or revision history all contribute to bigger file sizes. Additionally, older file formats like .ppt are less efficient than .pptx, which uses XML-based compression. Understanding these factors helps you identify what’s inflating your presentation and take steps to reduce the PowerPoint file size without affecting its visible content.
3. How to send a large PPT in an email?
Sending large PowerPoint files via email can be challenging because most email services have attachment size limits, typically between 20 and 25 MB. Large files often include high-resolution images, embedded videos, or extensive slide designs. To ensure your presentation reaches the recipient, you can reduce its size using built-in PowerPoint tools or alternative methods like saving in compressed formats or using cloud storage links.
Steps to Send a Large PPT via Email:
- Step 1. Open your presentation in PowerPoint.
- Step 2. Use the built-in tools to compress images or media (e.g., Compress Pictures or Optimize Media Compatibility).
- Step 3. Save your presentation as a more efficient format, such as .pptx or PDF.
- Step 4. If the file is still too large, compress it into a ZIP folder.
- Step 5. Alternatively, upload the file to a cloud service like OneDrive, Google Drive, or Dropbox and share the link in your email.