Images help make presentations more engaging. However, a strong photo may compete with your text for attention. This is why it helps to know how to control PowerPoint picture transparency.
The setting lets you place text over photos, create a subtle background, make a watermark, or remove an unwanted image background.
PowerPoint offers several ways to make your picture transparent, and this guide covers how to choose the best one depending on what you want to achieve.
Key Takeaways
- Picture Format > Transparency changes the opacity of the entire image.
- Remove Background helps isolate the main subject from its surroundings.
- Set Transparent Color works best when you want to remove one simple, solid color.
How to Make a Picture Transparent in PowerPoint
This method comes in handy when you want to adjust the opacity of the entire image without removing any of its content.
Step 1: Select the Picture
Open your presentation and click the picture you want to edit. This opens the Picture Format tab.
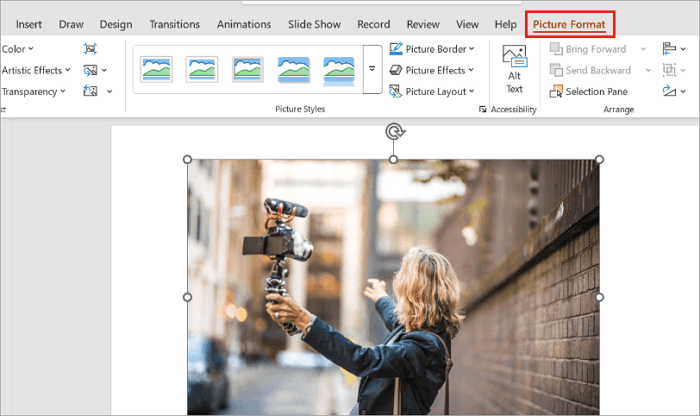
Step 2: Open the Transparency Menu
Go to Picture Format > Transparency. Here, you’ll find several preset transparency options for quick adjustments.
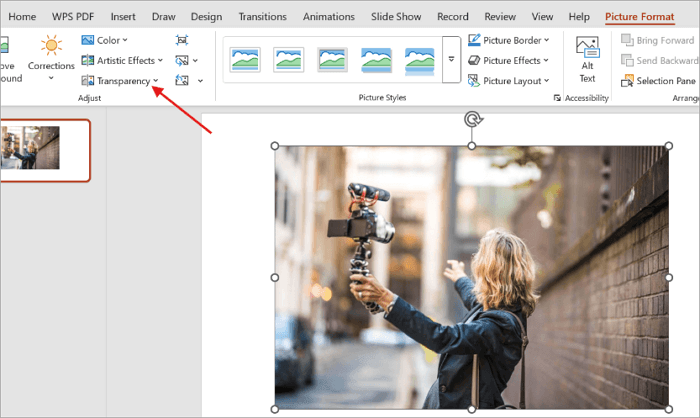
Step 3: Choose a Transparency Level
Select one of the presets and watch the picture change. A higher level of transparency makes the picture lighter and less visible.
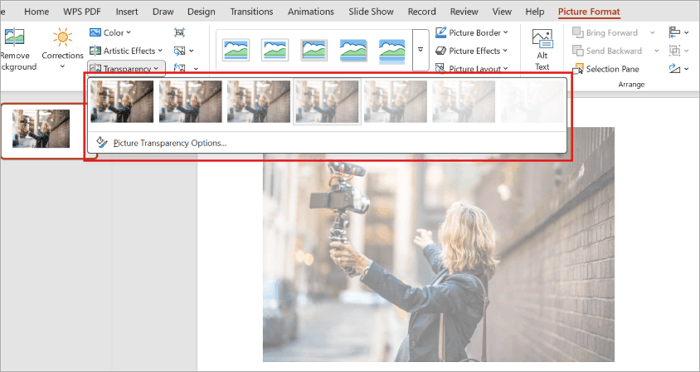
Step 4: Set a Custom Transparency Percentage
If none of the presets look right, select Picture Transparency Options from the Transparency menu. Then, use the slider to choose a precise level.
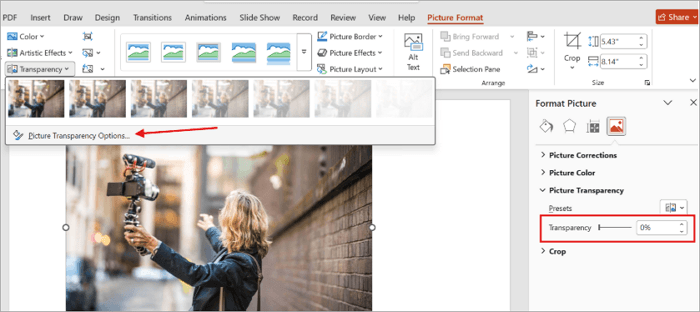
How to Make a Background Picture Transparent in PowerPoint
Sometimes, you may want to use a photo as a slide background or edit a background graphic. This background PPT image transparency option works best when text, charts, or other content must remain readable over a full slide.
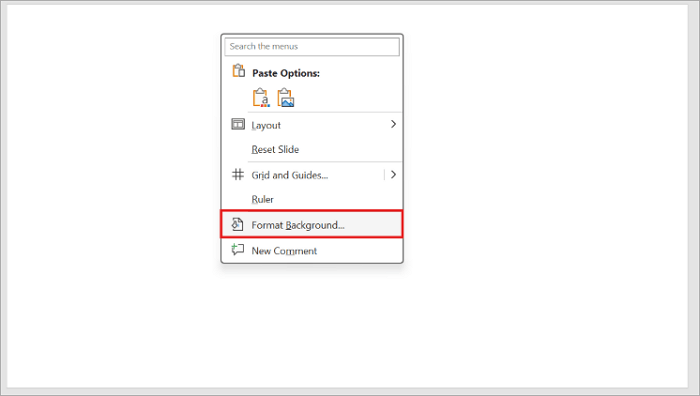
Step 1: Open Format Background
Right-click an empty area of the slide and select Format Background.
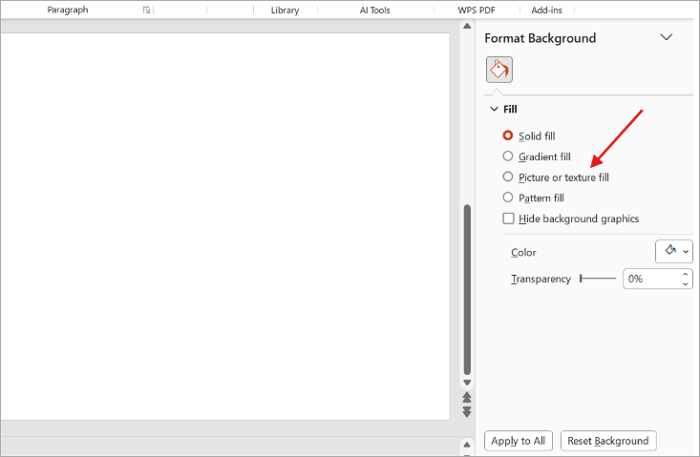
Step 2: Select Picture or Texture Fill
In the Format Background pane, select Picture or texture fill under Fill.
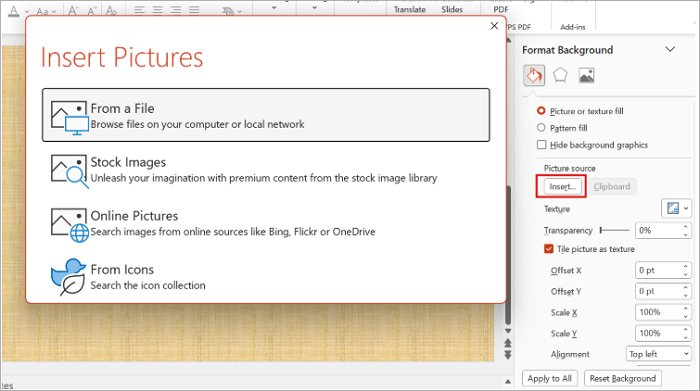
Step 3: Insert the Picture
Click Insert and select how you want to insert the picture.
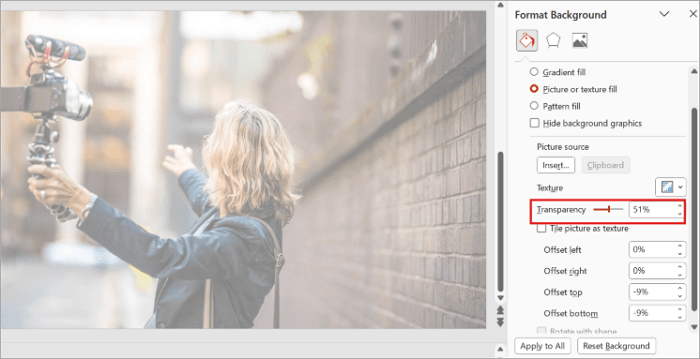
Step 4: Adjust the Transparency
After inserting the picture, use the Transparency slider in the Format Background pane to make the background lighter. Move the slider until the text and other content on the slide are easy to read.
How to Make Part of a Picture Fade in PowerPoint
In a situation where you want to place text beside an image, you can make one side fade gradually so the entire picture doesn’t become transparent. PowerPoint allows you to create this effect by layering a transparent gradient shape over the image.
Step 1: Insert Your Picture
Go to Insert > Pictures, add the picture to your slide, and position it where you want it.
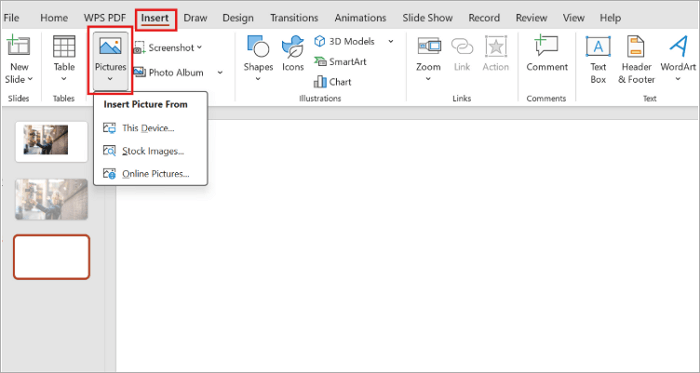
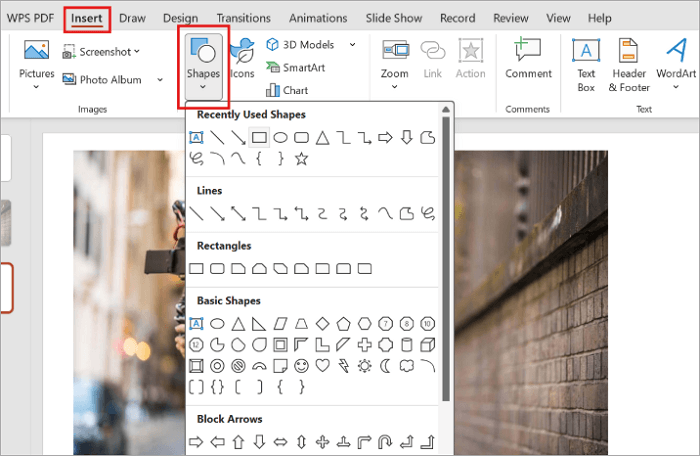
Step 2: Add a Shape Over the Picture
Go to Insert > Shapes and choose a rectangle. Draw it over the part of the picture where you want the fade to appear.
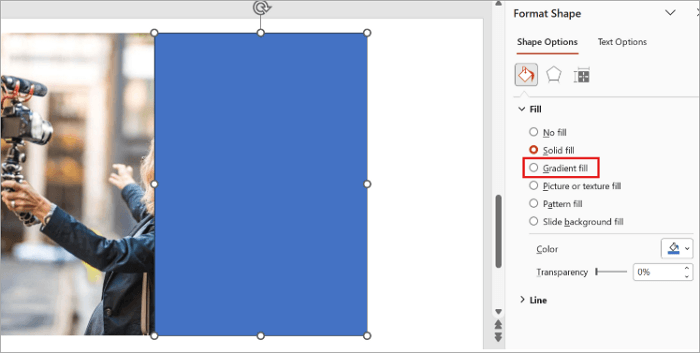
Step 3: Apply a Gradient Fill
Click the shape and go to the Format Shape panel on the right. Under Fill, select Gradient fill.
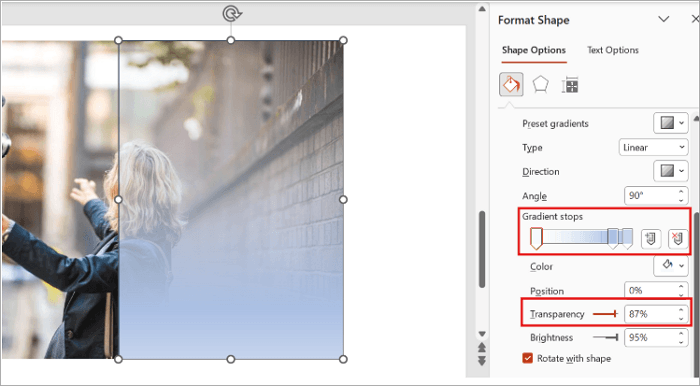
Step 4: Adjust the Fade
Move the gradient stops and adjust the transparency slider until the picture gradually disappears toward one side.
Common Problems With PowerPoint Picture Transparency
Even after following the correct steps to make an image transparent in PowerPoint, the results may not look the way you expect. Here are some quick fixes for common problems.
1️⃣The transparency button is missing: Make sure you have selected the picture itself. The Picture Format tab and its transparency controls appear after selecting an image.
2️⃣The background is not removed cleanly: If you need to isolate a person, product, or object, use Remove Background and manually mark areas that PowerPoint should keep or remove.
3️⃣Set Transparent Color removes the wrong part: Set Transparent Color works best with simple images containing a solid background. If several parts of the image use similar shades, selecting one color can make unwanted areas transparent.
4️⃣Text is still hard to read: Try using a darker or lighter text color, moving the text to a less detailed area, or adding a subtle shape behind the text.
5️⃣The transparent picture looks blurry: Transparency itself does not normally make a high-quality picture blurry. If the image looks soft, check its original resolution and avoid stretching a small image across a large slide.
Kesimpulan
PowerPoint picture transparency gives you a simple way to control how images interact with the rest of your slide. Instead of letting a photo compete with your message, you can soften it, fade part of it, or remove an unwanted background.
Choose the tool based on what you want to disappear. Use Picture Transparency for the whole image, Remove Background for the surrounding area, and Set Transparent Color for one simple color.
Finally, test the slide in presentation mode to confirm that the image and text remain clear on a larger screen before sharing it with an audience.
FAQs on PowerPoint Picture Transparency
PowerPoint offers various options for adjusting pictures, slide backgrounds, and individual colors. Here are answers to common questions to help you choose the right option.
1. How do I make a picture transparent on PowerPoint?
To make a picture on PowerPoint transparent:
- Select the image and go to Picture Format > Transparency.
- Choose one of the preset levels or select Picture Transparency Options.
- In the Format Picture pane, adjust the transparency slider or enter a percentage manually.
A higher percentage makes the image increasingly transparent.
2. How do I make one color transparent in PowerPoint?
Here’s how to make a single color transparent in your presentation:
- Select the picture.
- Go to Picture Format > Color > Set Transparent Color.
- When the pointer changes, click the color you want to remove.
This works best for pictures with simple, solid-color backgrounds, but may be less reliable when the image contains many similar shades or detailed edges.
3. How do I make only the background of a picture transparent?
To quickly make only the background of a picture transparent in PowerPoint:
- Select the picture.
- Choose Picture Format > Remove Background.
- PowerPoint will identify the area it thinks should be removed.
- Use Mark Areas to Keep and Mark Areas to Remove to refine the result.
- Then select Keep Changes.