Remember that time you inserted a photo into a slide and noticed it didn’t fit the layout, or the background details distracted from the subject? Knowing how to crop an image in PowerPoint can help solve these problems without requiring separate photo-editing software.
In this article, we will cover several ways to crop images in PowerPoint, from basic cropping to circular pictures and custom shapes.
Key Takeaways
- Use Crop and Aspect Ratio to remove unwanted image areas without stretching the subject.
- Use Crop to Shape to create circular, rectangular, and other-shaped pictures.
- Use consistent dimensions and picture placeholders for multiple images.
- Reposition pictures and choose Fill or Fit to control how they appear.
How to Crop a Picture in PowerPoint
The standard cropping tool is the easiest way to remove unwanted parts of a picture. Remember that resizing and cropping are different. Resizing changes the picture’s overall dimensions, while cropping hides unwanted portions.
You can also explore how to use images as slide backgrounds rather than standalone visuals.
Here’s how to crop a photo in PowerPoint:
Step 1: Open your presentation and select the picture you want to edit, or add a new one via Insert → Pictures.
Langkah 2: Go to Picture Format on the ribbon.
Step 3: Click the arrow beneath Crop and select Crop.
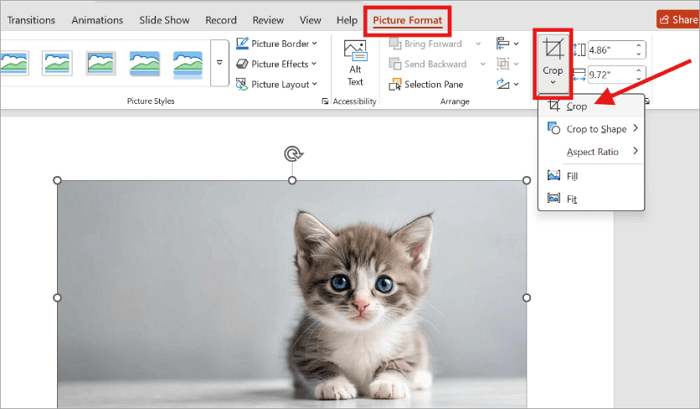
Langkah 4: Drag the black cropping handles inward to remove unwanted edges.

Step 5: Press Enter to apply the crop.
If your picture does not fit the intended area after cropping, go to Picture Format → Crop → Aspect Ratio and choose a proportion, such as:
- 1:1: Square images, such as profile pictures.
- 4:3: Traditional presentation and photo layouts.
- 16:9: Widescreen images that match modern presentation slides.
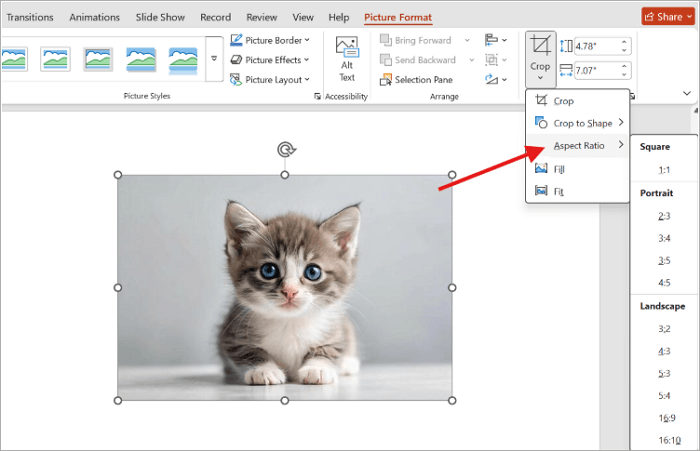
The Fill and Fit options in the Crop menu help you control how an image occupies its frame.
- Fill: Makes the image cover the entire frame.
- Fit: Shows the complete image inside the frame.
How to Crop a Picture into a Shape in PowerPoint
In some cases, you need something different from the default rectangular crop in PowerPoint. You might want to create a circular headshot, a rounded rectangle, or a custom-shaped visual.
There are two methods to crop pic in PowerPoint for this purpose.
Method 1: Use Crop to Shape
The Crop to Shape feature in PowerPoint lets you turn a regular photo into a circle, rounded rectangle, triangle, or another available shape.
Langkah 1: Select the picture you want to edit.
Step 2: Open Picture Format → Crop.
Step 3: Click Crop to Shape.
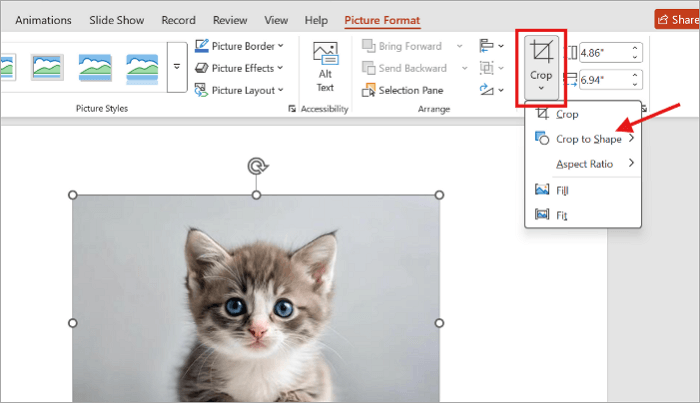
Langkah 4: Select any shape, such as an oval, rounded rectangle, or triangle.
Langkah 5: Adjust the crop handles to position the subject correctly.
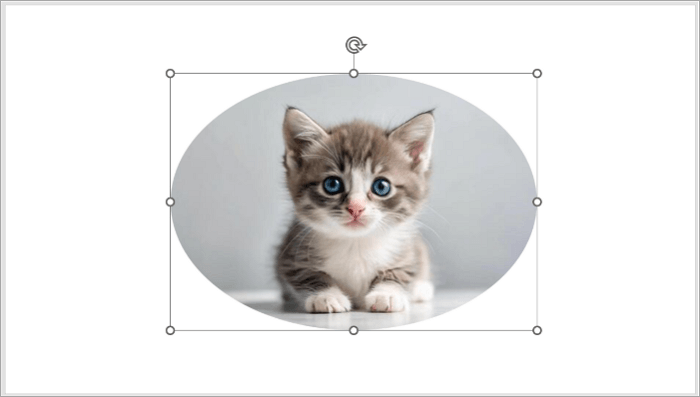
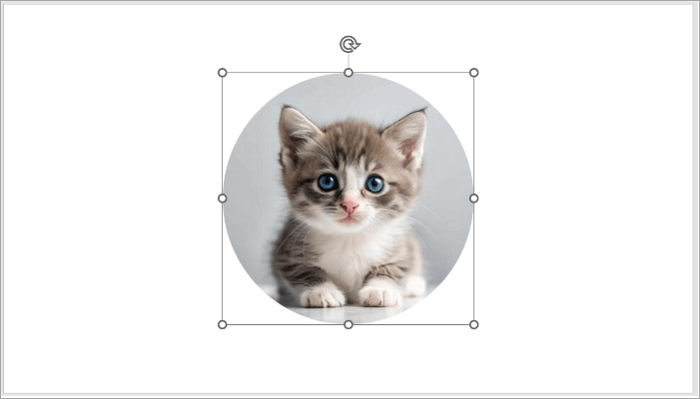
💡To create a perfect circle rather than an oval, especially for a circular profile picture, first select Aspect Ratio → 1:1. Then apply the oval shape.
Method 2: Use Merge Shapes for Custom Cropping
What if the shape you want is not available in the standard menu? The good news is that you can create a custom outline using PowerPoint’s Freeform tool and Merge Shapes.
This approach is useful for unusual image silhouettes, creative product showcases, or presentation designs that require more control.
Step 1: Insert your picture and select Insert → Shapes → Freeform.
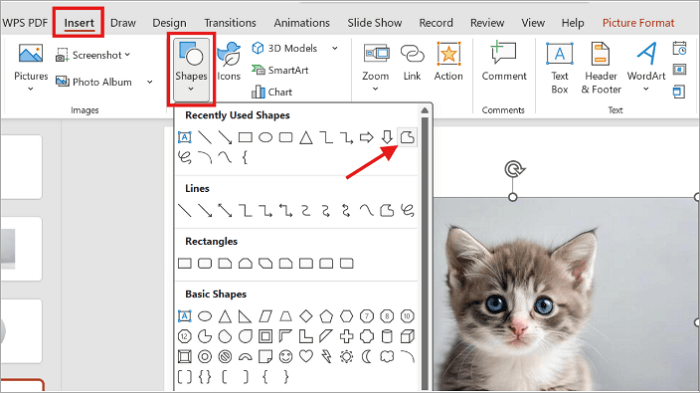
Langkah 2: Draw a closed outline over the part of the picture you want to keep.

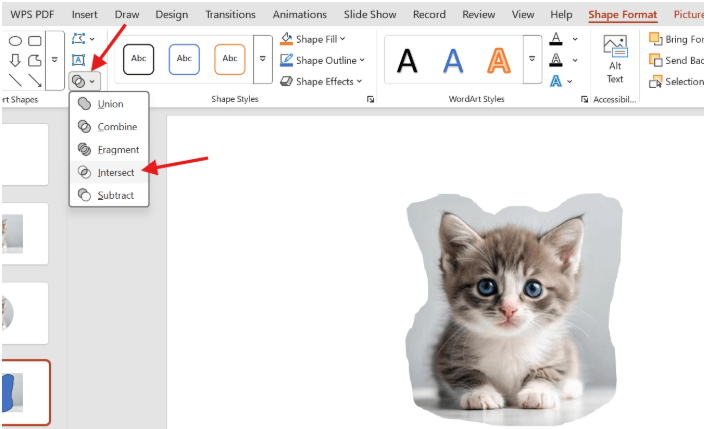
Step 3: Select the picture first, then hold Ctrl and select the Freeform shape.
Step 4: Open Shape Format → Merge Shapes → Intersect.
How to Crop Multiple Pictures to the Same Size
Imagine you are creating a team introduction slide with six different headshots. One thing you want to avoid is ending up with inconsistent image dimensions and framing.
Instead of cropping each image separately, follow this procedure to crop multiple pictures to the same size:
Step 1: Select all the pictures by holding Ctrl while clicking each one.
Step 2: Open Picture Format → Crop.
Langkah 3: Enter the same height and width values or shape for all the images you have selected.
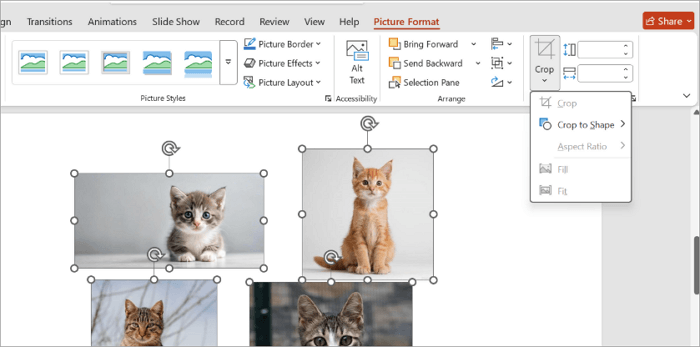
However, there are quicker ways to get structured layouts when cropping photos in PowerPoint:
- Picture Layout/SmartArt: Choose a SmartArt design from the Picture Layout menu and insert your photos into its image placeholders. This is useful for team profiles and visual comparisons.
- Slide Master.: Create a reusable slide layout with picture placeholders. Every new image inserted into the layout follows the same predefined frame, saving time when building several slides.

Beyond image placement, other presentation best practices, such as using consistent fonts, clear layouts, and relevant visuals, can make your slides easier to follow.
Kesimpulan
When you crop an image in PowerPoint properly, you help your audience focus on the right details in your presentation, whether they relate to business results, products, or educational concepts.
Consistent framing can also make ordinary photographs look more professional than adding decorative effects.
Before presenting, review your slides at full size and check that important details are not cut off. If you’re building a new deck, explore AiPPT templates for layouts that make working with images easier.
FAQs About Cropping Pictures in PowerPoint
Still have questions? These answers cover the most common challenges users face with cropping pictures in PowerPoint.
1. How do you crop pictures in PowerPoint online?
To crop a picture in PowerPoint for the web:
- Open your presentation in PowerPoint online.
- Select the picture you want to crop.
- Open the Picture tab and select Crop.
- Drag the cropping handles inward to remove unwanted areas.
- Click outside the picture to apply the changes.
The web version supports basic cropping, but you may be unable to access some advanced picture-formatting features. They are available only in the desktop application.
2. How do I crop a picture to an exact size in PowerPoint?
Here’s how to crop a graphic in PowerPoint to a specific size:
- Select Picture Format → Crop → Aspect Ratio.
- Choose the required proportions.
- Adjust the cropping handles to frame the subject.
- Then use the Height and Width boxes in the Size group to set the picture’s dimensions on the slide. Keep the aspect ratio locked to prevent distortion.
3. Why is the Crop option greyed out in PowerPoint?
The Crop option may be unavailable because you’ve selected a shape, text box, group, or another object instead of an editable picture.
Select the actual image to display the Picture Format tab. If the image is inside a group, try ungrouping the objects and selecting the picture directly.