A voice-over is like a recording of a person speaking or narrating a story. Your presentation will stand out from the rest if you can add a voice to the picture.
Compared to traditional presentations, Google Slides with voiceover creates an immersive experience for the audience. And what’s more, the presentation will run itself, without your help! We will explain how to add a voiceover to Google Slides step by step in this tutorial. You will learn multiple methods to record voiceover on Google Slides, along with many helpful tips.
🔍 Related Post: >> How to Add Music to Google Slides on Windows/Mac/Phones
How to do a Voiceover on Google Slides in 3 Ways
If you already have the narrative recorded, you can proceed with Method 1 below. If not, we will show you how to do a voiceover on Google Slides.
Method 1. Add Voice Recording to Google Slides from Google Drive
It’s quite easy to upload your voice recordings to Google Drive and then add them to Google Slides to make your presentation more engaging. First of all, you need to convert the audio file to MP3 or WAV format, as Google Drive only supports these two audio formats.
If your audio file was recorded in M4A format, which is standard on Apple devices, convert it to a compatible format before uploading.
📝 Then, we will show you step by step how to add a voice recording to Google Slides:
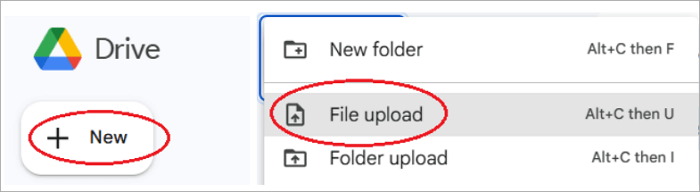
Step 1. Go to Google Drive and click the “New” button in the top-left corner. When the dialog box appears, select File upload, then choose the audio file from your computer. Alternatively, you can simply drag and drop the file into Google Drive.
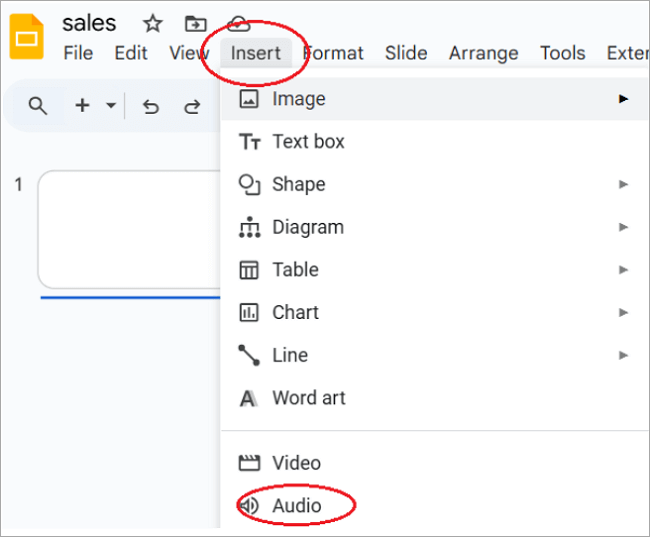
Step 2. Open your presentation in Google Slides. Then, from the top menu, select Insert, and choose Audio.
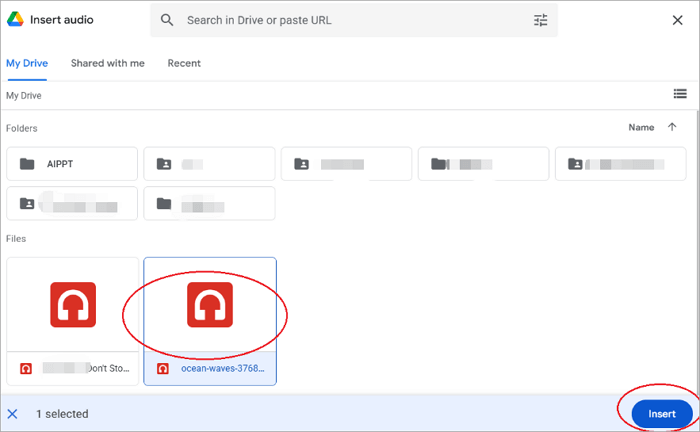
Step 3. In Google Drive, select the Audio file you want and click Insert.
Step 4. Once the Audio file is inserted in the Slide, a speaker icon will appear in the bottom left corner. You can play the audio by pressing the speaker icon.
You can move the speaker icon to a different place in the slide if needed. To customize the audio playback, use the Format Options menu on the right side of the screen.
The Audio will play back automatically when the slideshow is running or when you click, depending on the setting in the format options menu. If you select On click from the format options menu, the audio will play when you click after arriving at the particular slide.
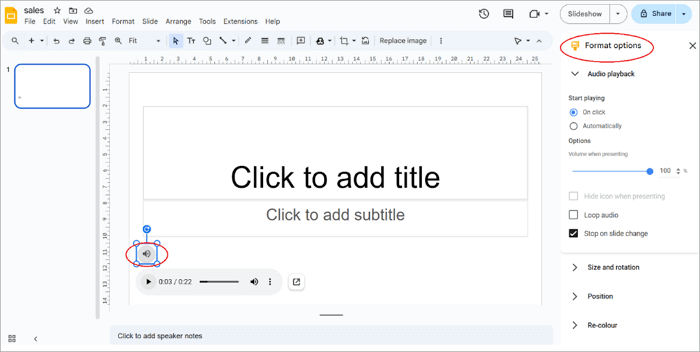
The format options menu allows you to fine-tune audio in your presentation, offering options such as adjusting playback volume and enabling loop audio for continuous playback.
Method 2. Narrate Google Slides Using an Add-on
Don’t have an audio file already recorded? No need to worry. We will guide you through recording your voice for the presentation from start to finish.
While Google Slides does not have a built-in voice recorder option, you can use a Chrome extension, such as Mote, to record audio directly in Google Slides. This will help you to complete the voice-over within the presentation. No need to switch apps, edit audio, or upload files.
However, Mote allows little control over your audio. It has a lower bit rate than dedicated recording software, and it can be challenging to export the audio if you need to use it elsewhere.
📝 Let’s see how to narrate Google Slides using Mote.
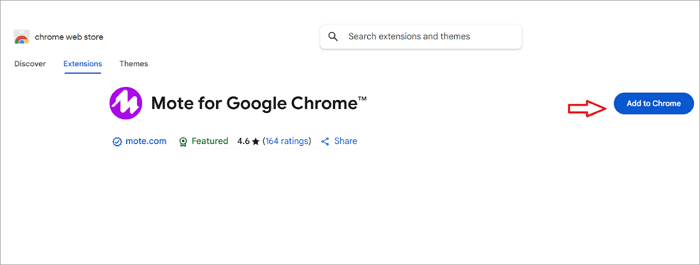
Step 1. Install the Mote Chrome extension on your computer.
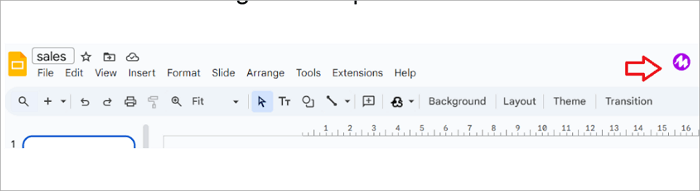
Step 2. Log in using Google or email. Once the add-on is successfully installed, you will see the Mote icon in the Google Slides presentation.
Step 3. Allow permissions to Mote to use the microphone and save to your Google Drive.
Step 4. To add audio to the Google Slides presentation, click on the Mote icon in the top menu. A pop-up menu will appear. Click on the brand icon to record your voice-over.
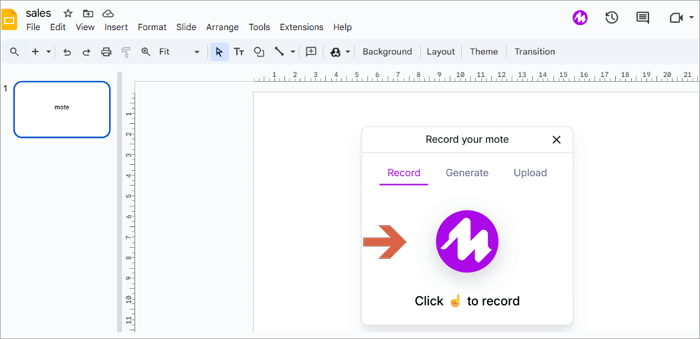
Step 5. Once the recording is complete, click insert. The Mote extension will add it directly to Google Slides. Click the speaker icon to play back the audio! You have successfully added voice to your presentation!
Method 3. Screen Record Voice on Google Slides
Your computer’s built-in screen recording tool can also help in adding voiceover to Google Slides. But using this method to record voice on Google Slides will create a video with a much larger file size than an MP3 audio we discussed earlier.
For tutorials, lectures, and similar projects, this method helps add your pacing and tone to the displayed slide. In addition to your computer’s built-in recording tools, you can also opt for third-party software, such as OBS, Loom, or Camtasia, to add voice in Google Slides.
📝 The following is a step-by-step guide to make a screen recording using OBS software.
Step 1. When you are ready to record, open OBS and select Window Capture from the Sources menu
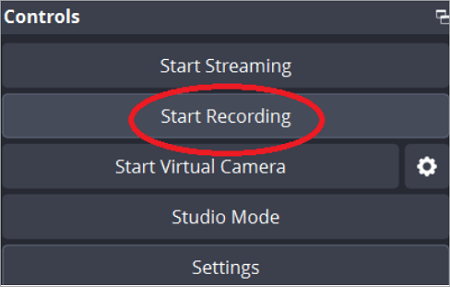
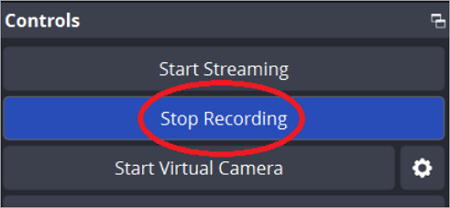
Step 2. When you are ready to speak, click Start Recording in the controls menu.
Step 3. Present your slides and narrate them clearly as you progress through each one. Click Stop Recording after you finish speaking. The audio file will be saved in the chosen folder.
Step 4. Upload the file to Google Drive. In Google Slides, go to Insert > Video tab to add the file from your Google Drive and create a Google Slides with a voiceover.
Tips for Making Google Slides with Voiceover
Want to make it impressive? Consider the following pro-tips before you start recording.
- Keep your narration clear and concise, ideally, under one minute per slide.
- Play back your audio before going for the live presentation. Edit the clip and adjust the volume as needed.
- Ensure that all audio clips in the presentation play at the same volume.
- Run through the entire presentation to ensure the outcome is polished and easy to follow for the audience.
Conclusion
While Google Slides does not have a built-in tool to add narration, there are several ways to record voiceover on Google Slides. We have discussed three methods to add a voiceover to Google Slides with detailed steps, along with pro tips that will help you create a crisp and engaging presentation.
It’s helpful if you write a script of your narration before starting the recording. Your voiceover will sound sharper and more engaging!
FAQs on Google Slides Voiceover
Could not find the answer to your problem? See below.
1. How to do a voice-over on Google Slides on a Chromebook?
You can use the built-in Audio Recorder tool in the Chromebook to create the voice-over:
- Open the launcher, and type “ recorder” to find the app.
- Click the Record (Microphone) button to start recording. Your narration will be saved to the Chromebook, but you may need to convert the audio file to MP3 or WAV format before uploading to Google Drive.
- Go to your Google Slides presentation and insert the saved Audio File to the slide by clicking Insert > Audio.
2. Can you do a voice-over on Google Slides on a Mac?
Your Mac comes with applications like Voice Memos, GarageBand, and QuickTime Player, which are ideal for recording audio. Record the voiceover using an app that suits your requirements.
Mac audio recordings are commonly saved in .m4a format, which is not compatible with Google Slides. Please convert to MP3 format before uploading. Upload the final audio file to Google Slides by selecting Insert> Audio in the menu.
3. How to record a Google Slides presentation with audio and video?
There are several ways to record a Google Slides presentation with Audio and Video using third-party apps. OBS, Chrome extension Screencastify, or PowerPoint can help you record a Google Slides presentation.
To use PowerPoint, you need to:
- Download the Google Slides presentation as a .pptx file by going to File > Download> Microsoft PowerPoint (.pptx) first.
- Once the file is downloaded, open it in PowerPoint and go to the Record tab>Record from beginning.
- After the recording is complete, select Export to video in the same tab to save the video to your computer.